GNAT Tracker 4.0 User Guide
This document will provide instructions and information on how to use GNAT Tracker 4.0 - the latest version of AdaCore’s customer interface for downloading the GNAT Pro technology, communicating with our expert support team, and managing your customer account.
Connecting to GNAT Tracker
To connect to the portal, please use the following URL: https://support.adacore.com/csm.
Your user name on this portal is the email address that you have communicated to AdaCore when opening your account - the same address as you used in the previous version of the portal, if you were an existing customer.
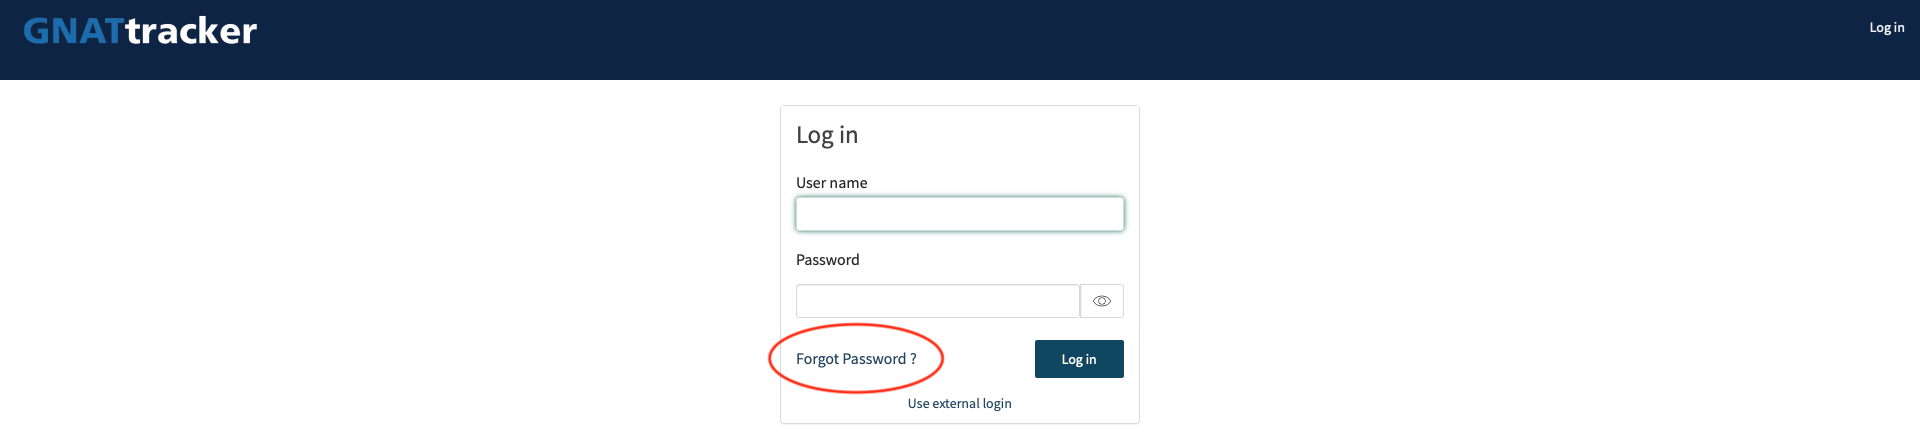
The first time you connect to the portal, you will have to set your password, this is done by clicking on the Forgot Password ? link.
The GNAT Tracker main page
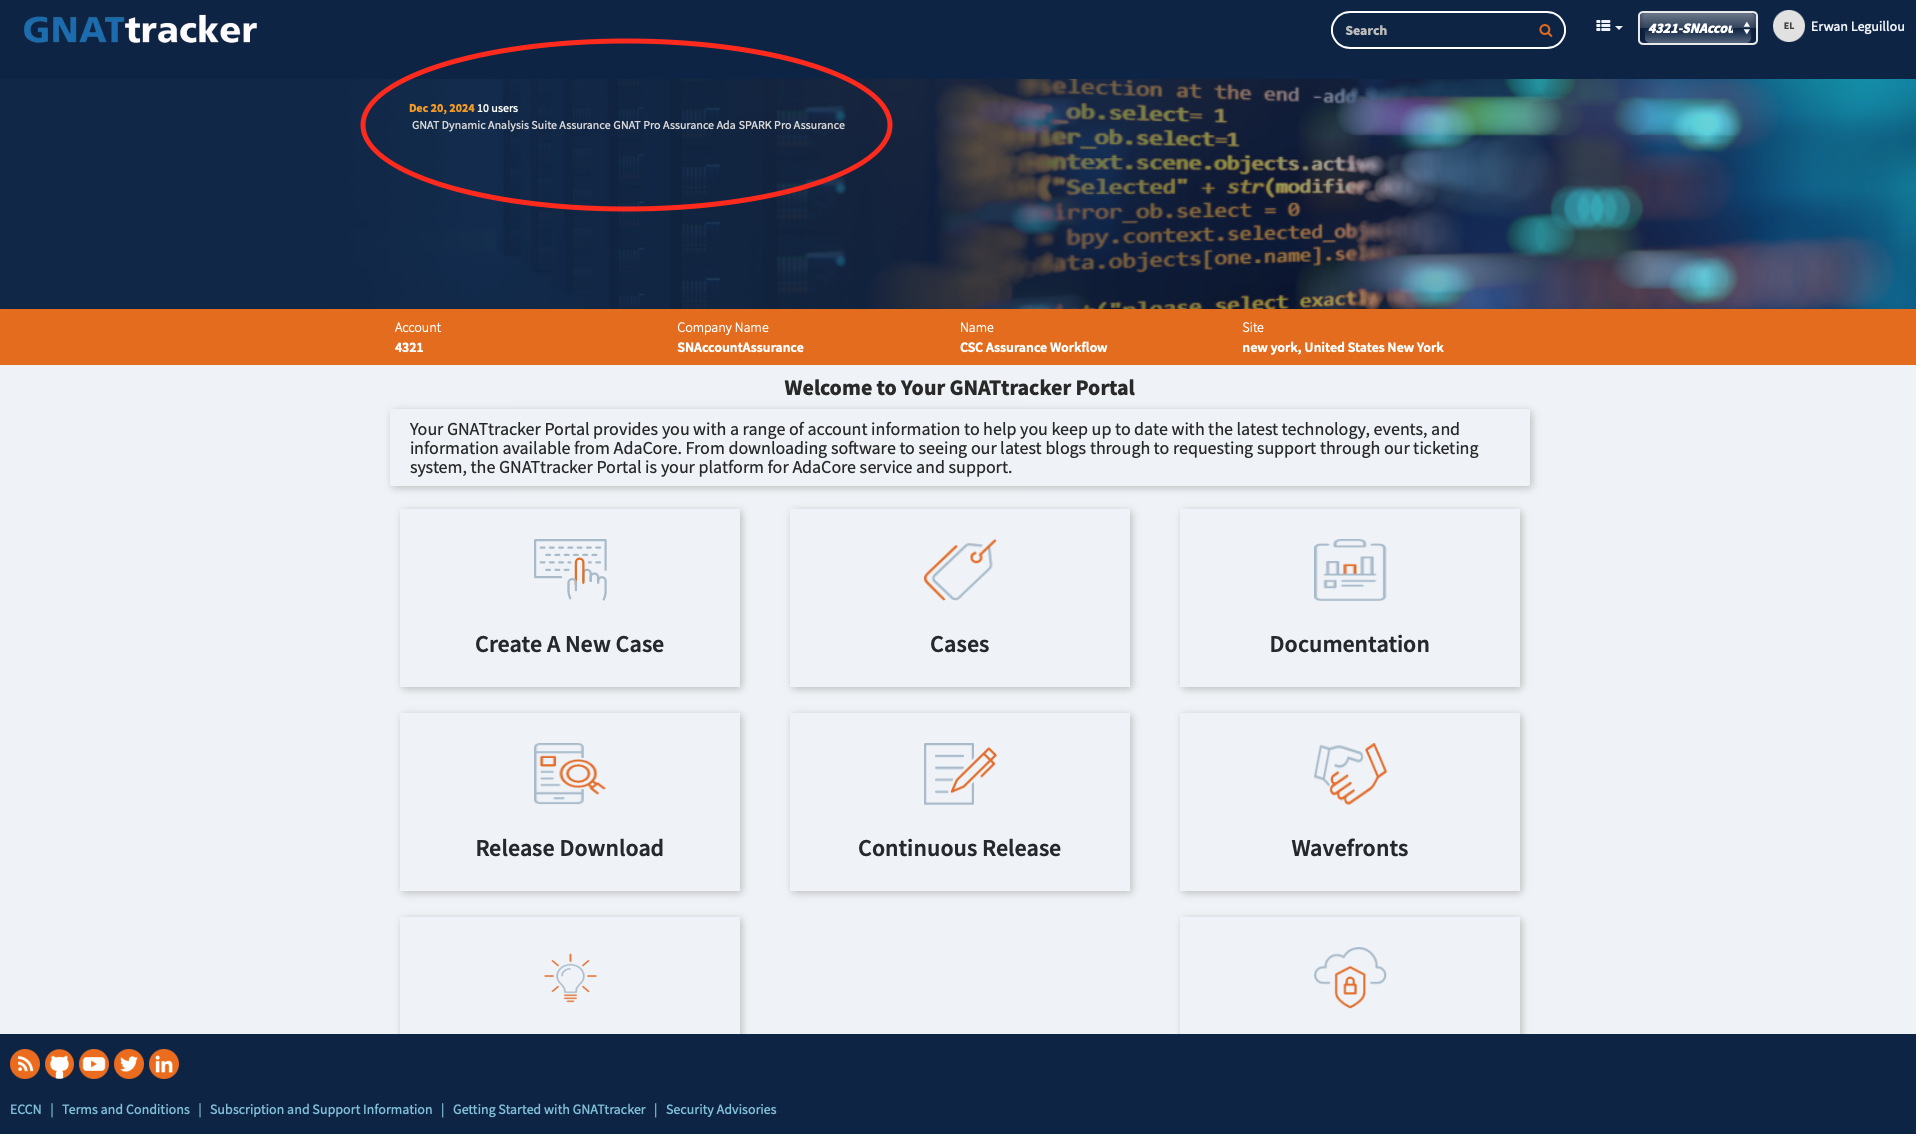
Once you’re connected to the portal, you have access to the main page.
If your address is associated with more than one account with AdaCore: you can select the account you want to work with in the top right corner.
- The landing page displays:
A brief description of the subscriptions for your account
Tiles for quick access to portal activities
Additional information such as the AdaCore blog, online courses, upcoming events and the latest news from AdaCore.
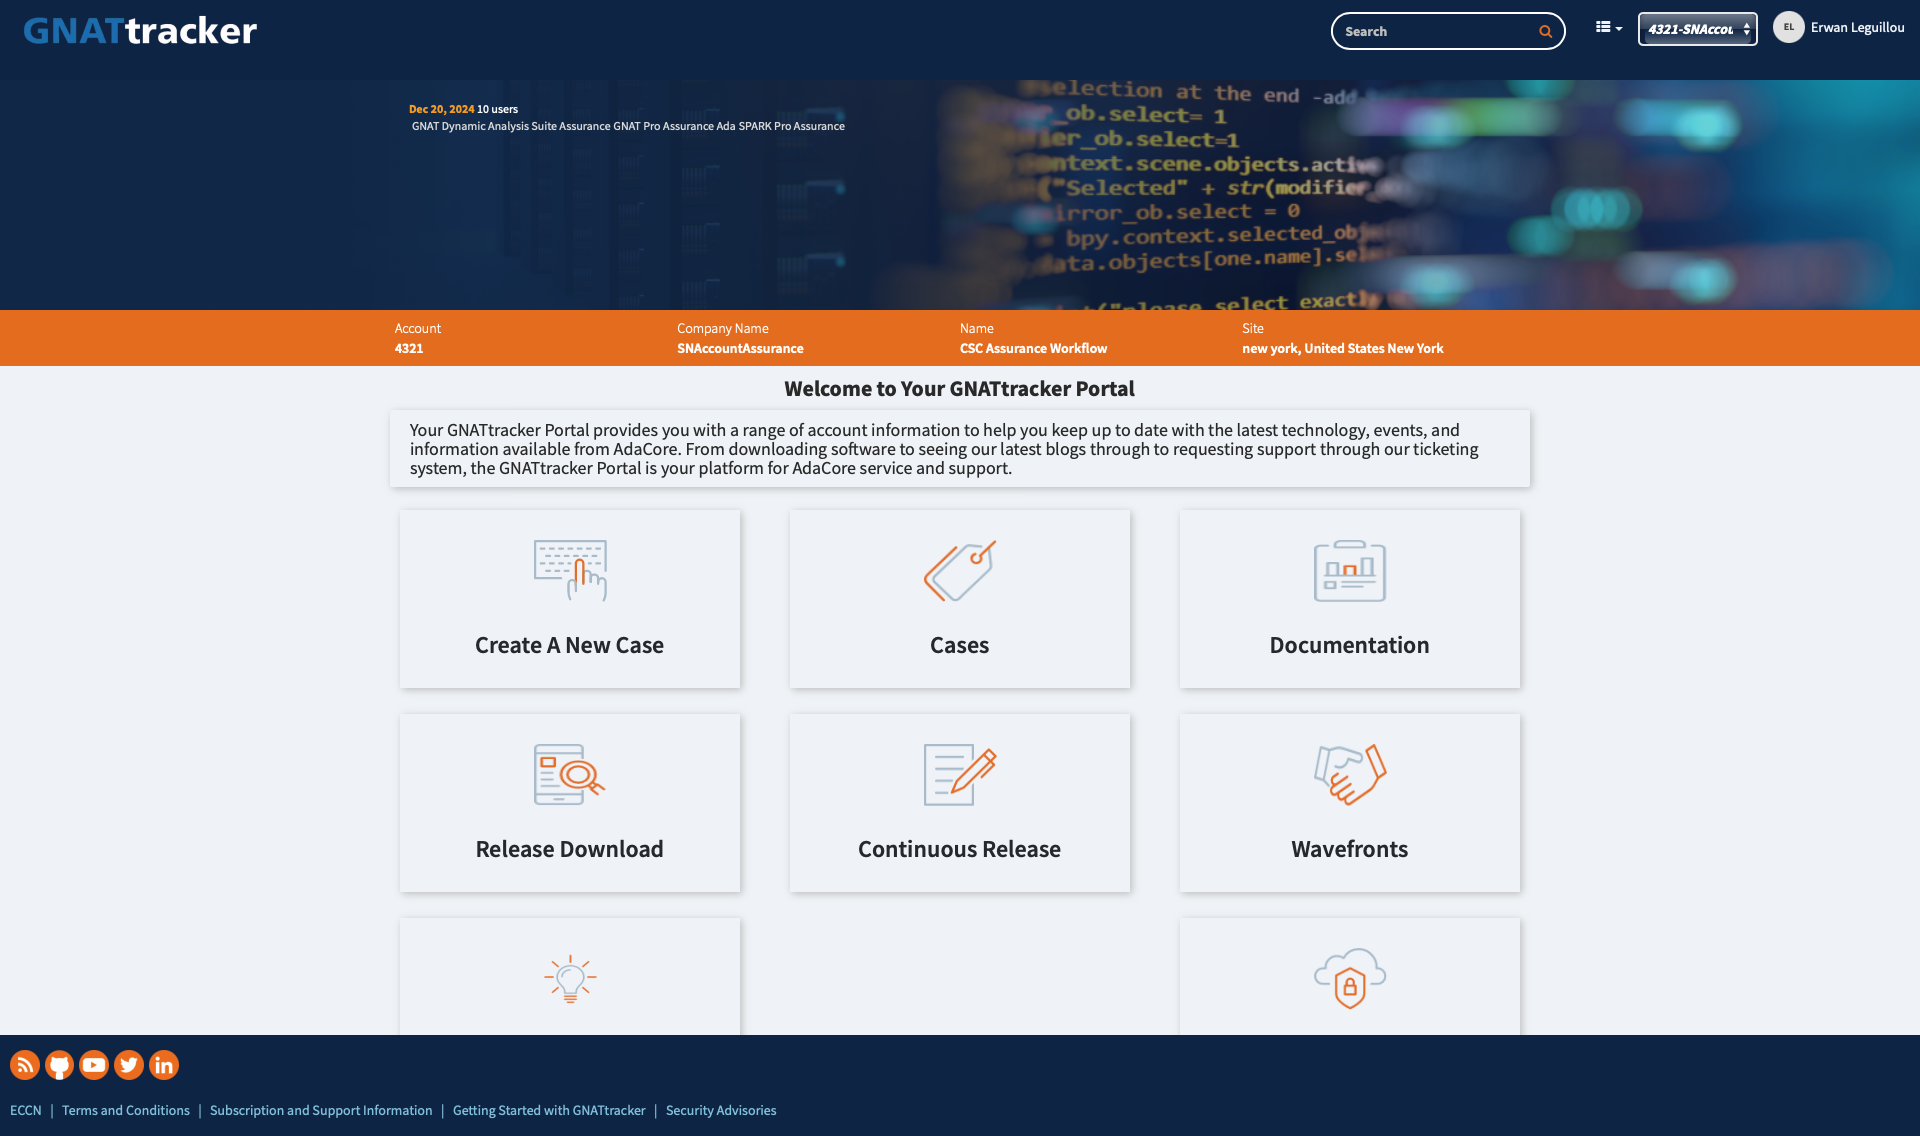
The main page
Creating cases
Cases are the way to contact AdaCore support.
If you belong to more than one account: when creating a case, make sure you have the right account selected by refreshing the current page, especially if you have multiple tabs or browser pages opened on GT4.
To create a case, click on the tile “Create A New Case” on the main page. Alternatively, you can also use the menu at the top right of any page. There are different types of cases, depending on your request:
Technical request: any request related to a technical issue (e.g. bug report, enhancement request)
Account management request: request related to account information (e.g. ask for updates to account contacts, questions on product access, subscription renewal). These are available if you are listed as an administrator for your AdaCore account.
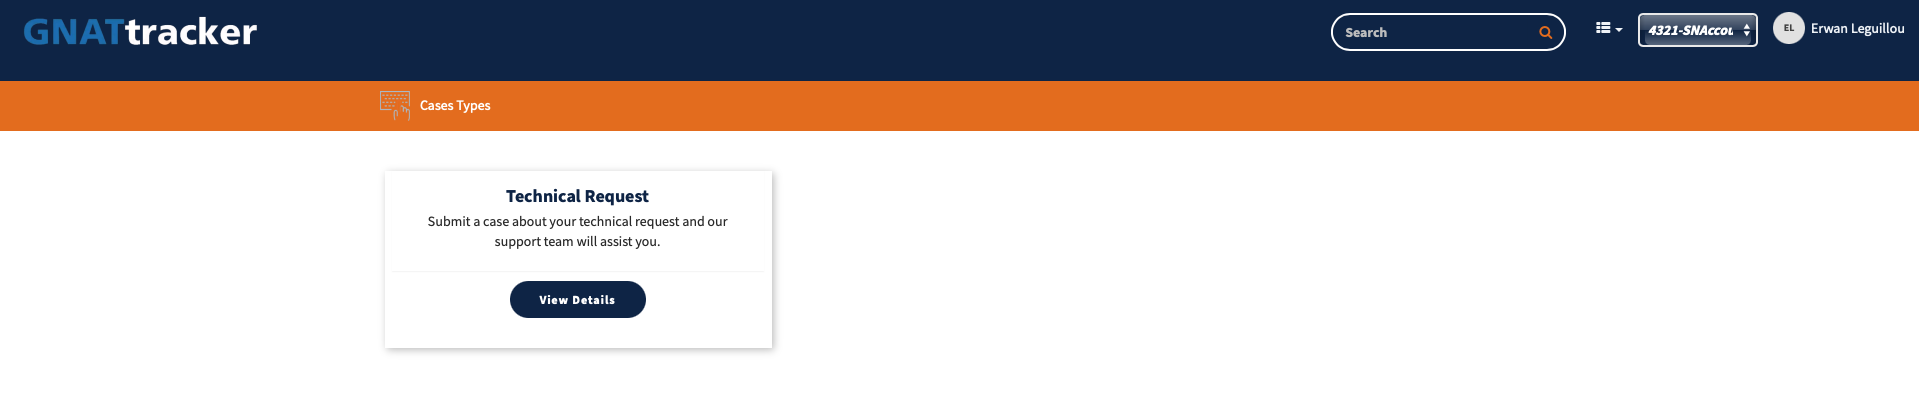
The Case type selection
First, identify the software for which you have the request
Component: drop down list populated from your subscription information
Platform: drop down list populated from your subscription information
Version: free field to indicate the version
Parent case number: you can link your new case to an existing one when submitting it through your GT account. This helps us assign the right expert and ensures seamless service by providing us with valuable background information.
Optionally, you can provide some additional information:
Priority: 1 - Low, 2 - Moderate, 3 - High
Category: Bug, Enhancement Request, Query (default)
You then describe your request
Subject: a quick description of the request
Message: a more detailed description of the request
Add Attachments: upload files on the case
You can also add other information
Copy to: add the list of recipients who should be added to this case’s “Watch List”, which is the list of recipients who will get an email copy of all messages exchanged on this case.
Customer use: fill this with your internal reference identifier, if any.
When done, click on Submit.
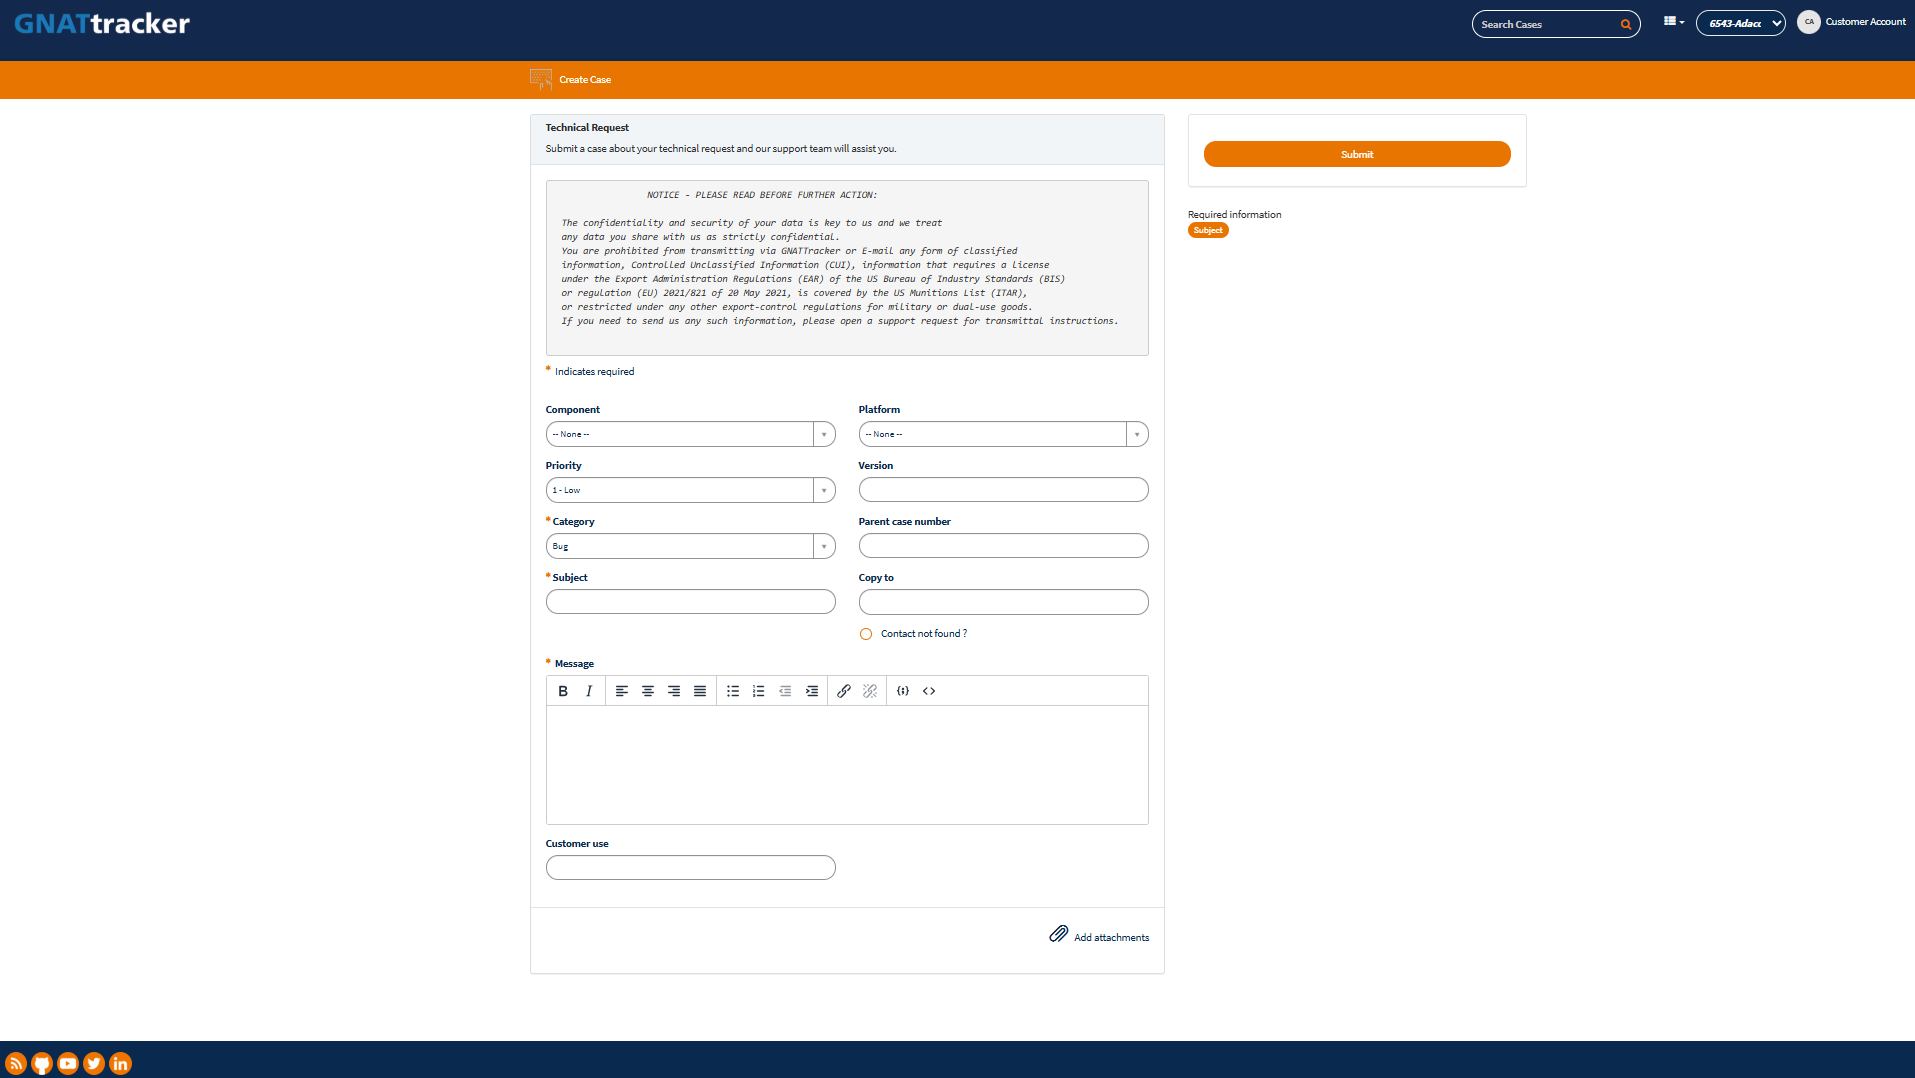
The Case creation form
It is also possible to create a case through email. For that, send an email to support@adacore.com with your account number #xxxx in the subject.
Viewing cases
To view the list of cases, click on “Cases”, or use the menu at the top right of the page. Four lists are available:
Open: cases currently being handled by AdaCore.
Action needed: cases for which AdaCore is waiting for more information from you.
Closed: the list of closed cases.
All: all the cases for the selected account.
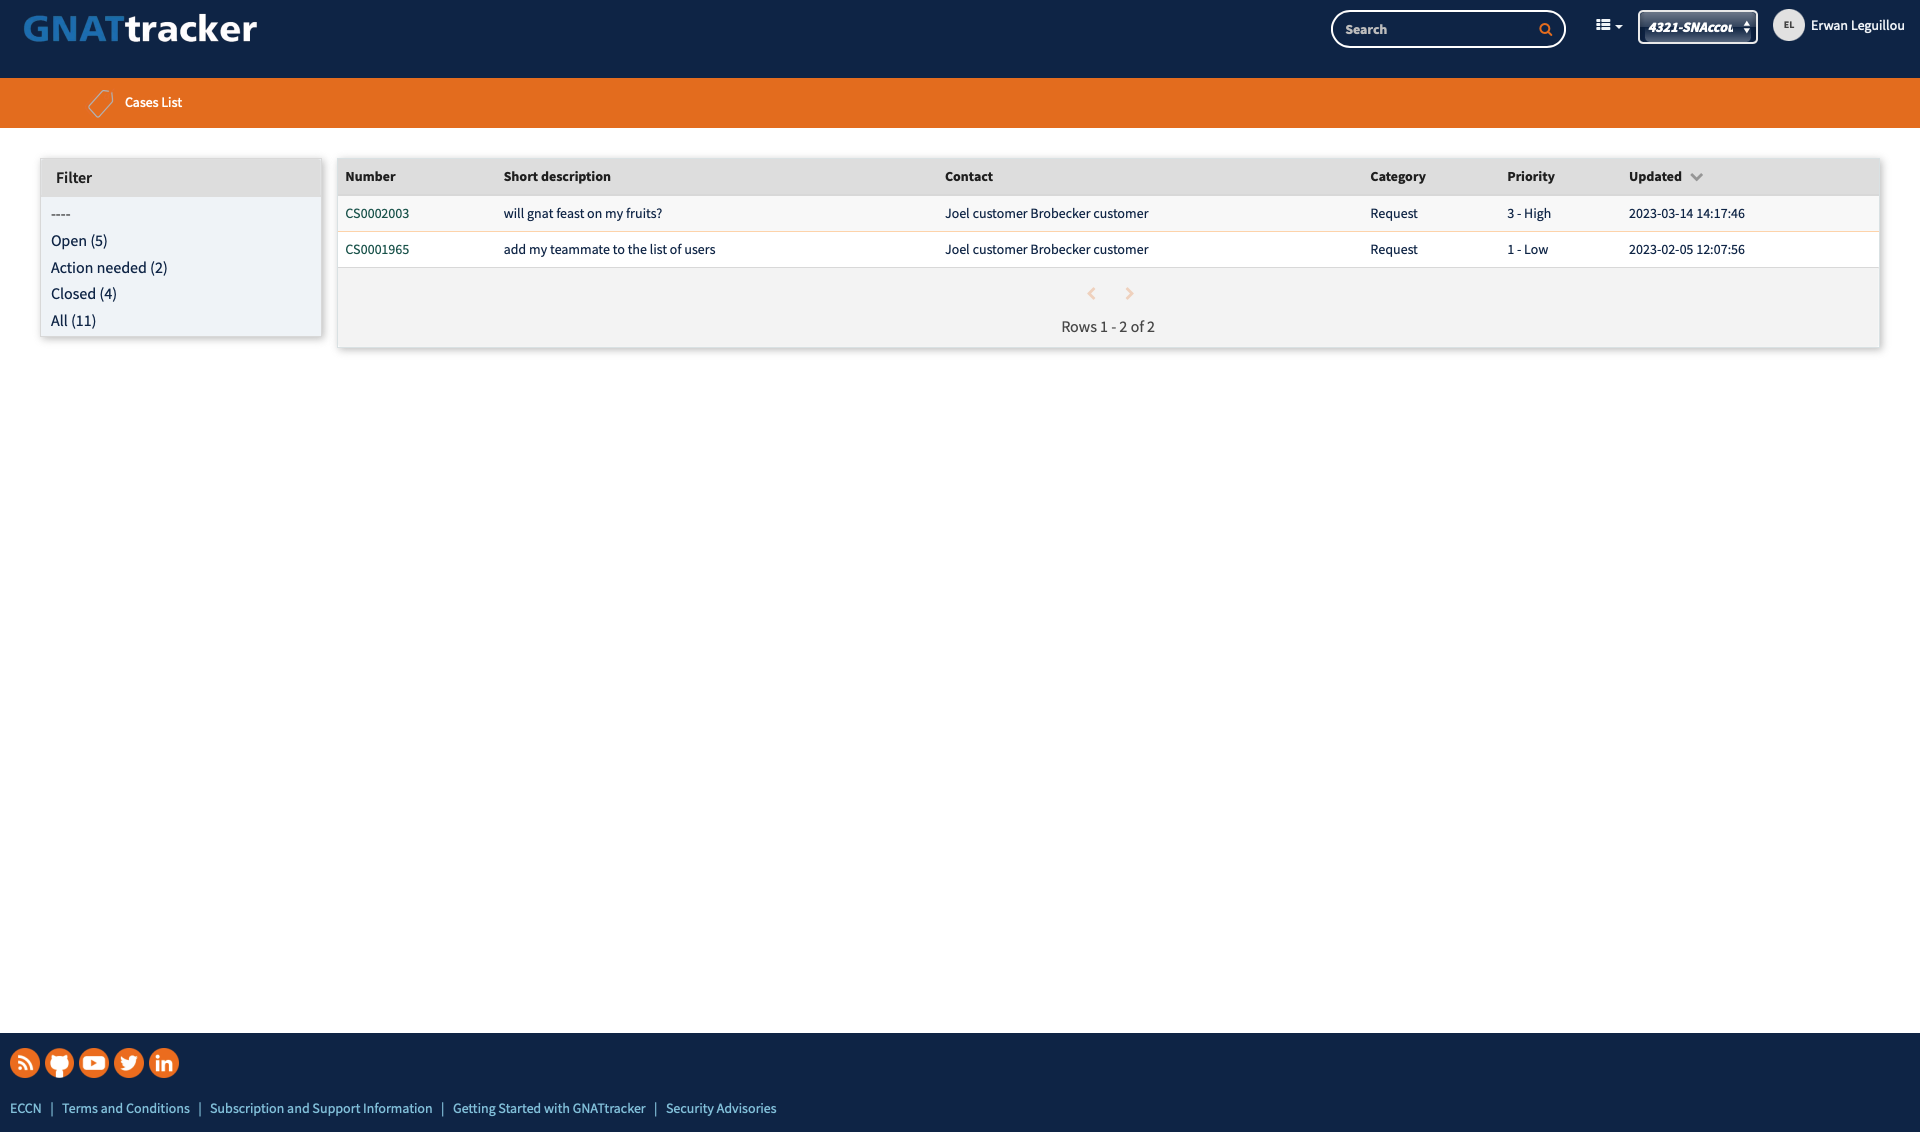
The Cases Lists
Viewing cases from multiple accounts
If you are associated with multiple accounts, the case view will display two left panel boxes; The upper one is for the currently selected account, the account number is displayed in the header. Below, the #All box will allow you to access and update all the cases across the accounts you are associated with. In this #All box an ACT column has been added to ease your filtering and navigation within the cases.
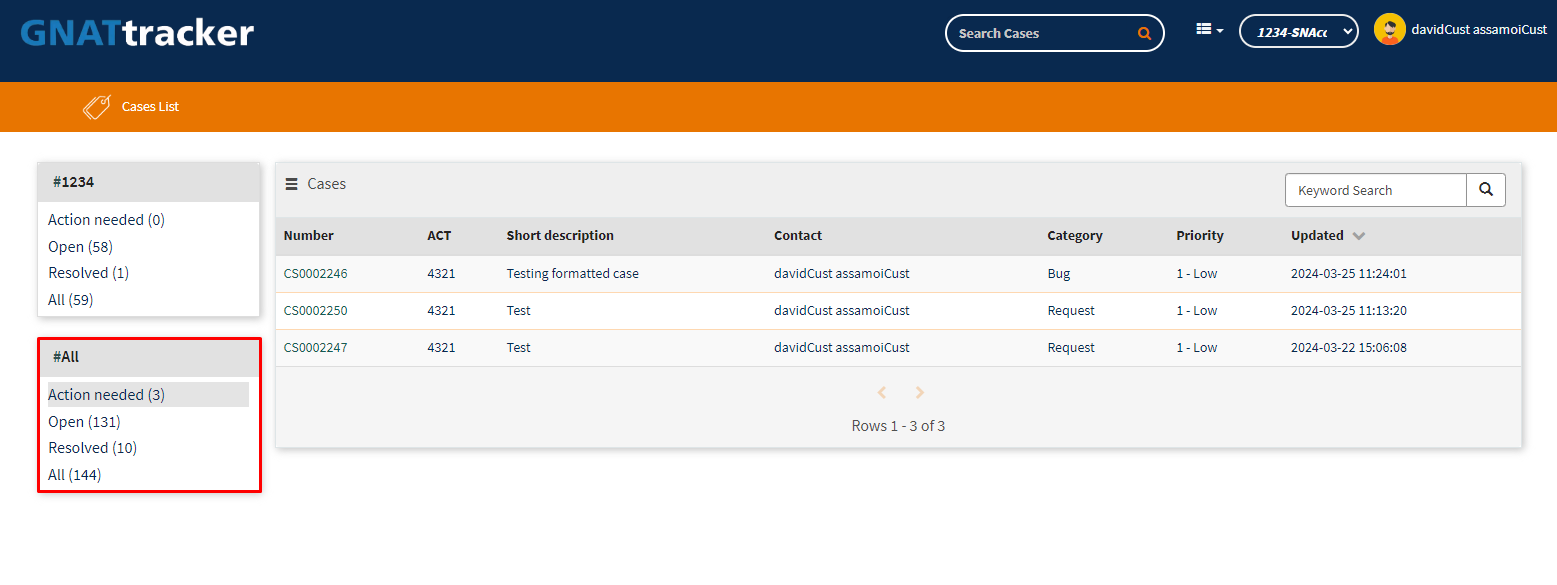
The Cases Lists with multiple accounts
Viewing an individual case
From the cases list, you can access the detailed information for a case by clicking on the corresponding line.
You then have access to the case information: number, priority, category, account, state
You also have access to the history of discussions and you can respond there by adding comments.

Viewing one Case
In addition, you can manage the case’s watch list (list of people who receive a copy of all messages exchanged on the case) by clicking on the “Watch List” tab. From there, you can add or remove users from the watch list.

Managing the case’s watch list.
Note
To reduce the number of email notifications, GNAT Tracker does not send authors a copy of the messages they send.
Similarly, you can access the case’s attachments through the “Attachments” tab. This tab will give you access to all attachments for the current case and also allows you to add new attachments.
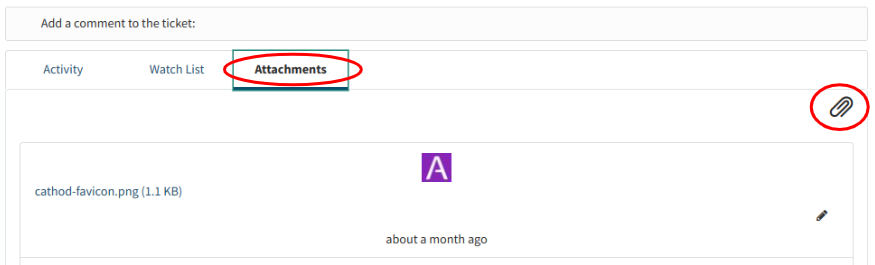
Managing the case’s attachments.
Subscribe to account’s case notifications
By default, you will only receive email notifications for cases where you are an explicit participant. Those are cases that you either opened, where you were explicitly added at case creation, or for which you were added as a participant afterwards via the Watch List. In addition to this, GNAT Tracker offers a subscription preference allowing users to receive email notifications for all cases regardless of whether they are a direct participant or not. To do so:
On the top right of the interface, click on your name and select Profile.
Check the option “I wish to subscribe to all cases” of the selected account.
Click on Update Preferences.
This setting takes effect on all cases of the selected account, including existing ones.
Repeat the process after selecting another account if you wish to subscribe to notifications on several accounts.
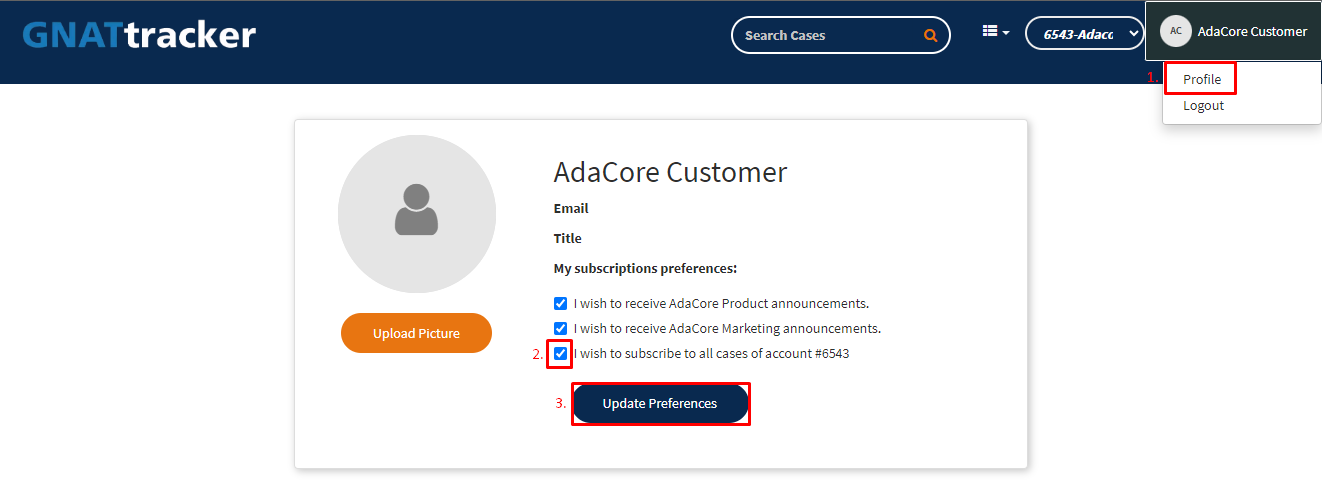
Subscribe to notifications for all cases of the selected account.
Downloads
Four kinds of downloads are accessible from the tiles of the main page, or from the menu at the top right of the page:
Release downloads: the official AdaCore releases.
Continuous release downloads: intermediate releases available throughout the year.
Sustained downloads (for accounts with an Assurance subscription)
Wavefronts: packages delivered only to your account, in response to a particular case.
From the Release download page:
Select the platform and the release you want to download
Expand the component you want to download, and click on the file.
Downloads
Product Security
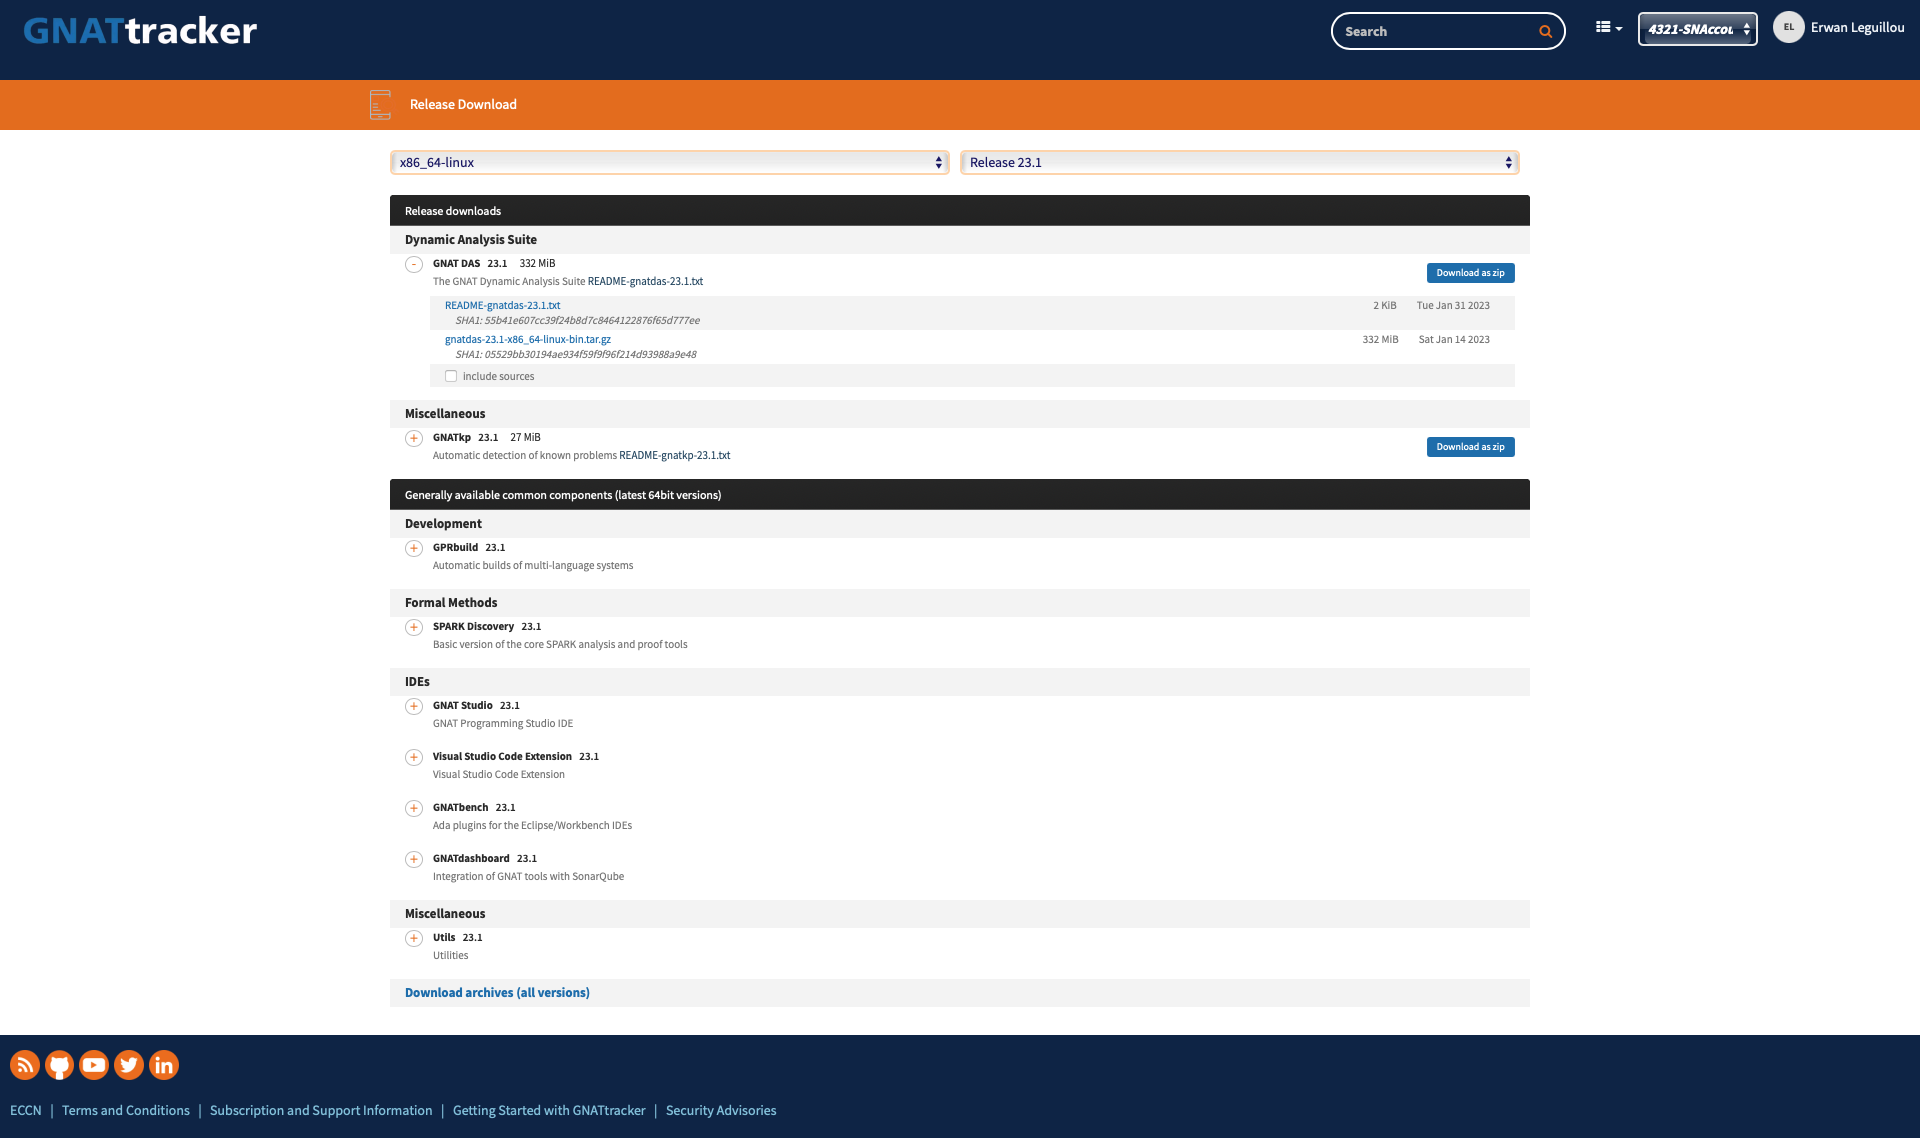
Several files related to Product Security may be downloaded alongside the component.
SBOM Files
For version 23.2, the gnat, gnat-c and gnat-cxx components had the
first SBOM (Software Bill Of Materials) files attached, under SPDX
tag:value format (which is human readable).
From version 24.1 onward, all our components come with an attached SBOM under
SPDX tag:value format (which is human readable).
From version 25.2 onward, all our components come with an attached SBOM under
SPDX tag:value format (which is human readable) and JSON format
(which is more machine parsing oriented).
All SPDX files follow the SPDX Specification version 2.3.
SBOMs downloads
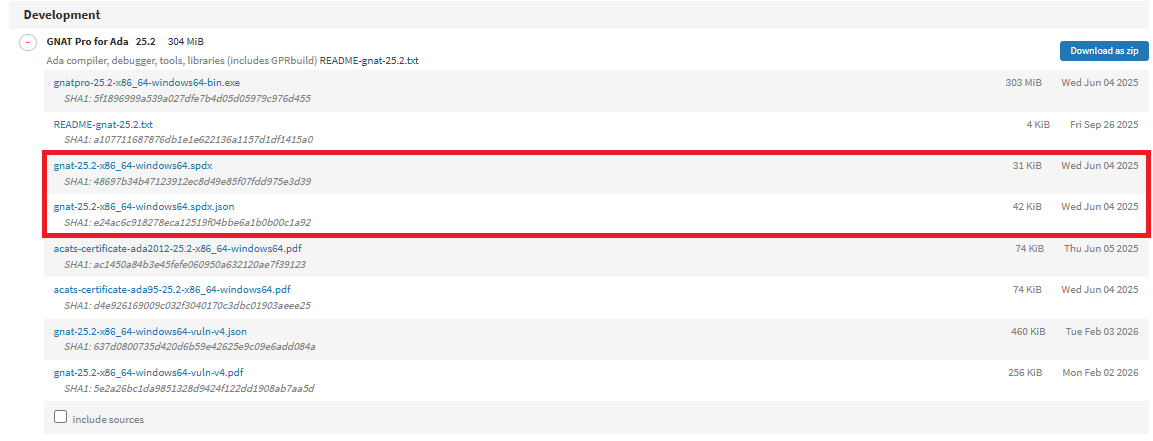
Vulnerability reports
From version 24.2 onward, all our components come with an attached PDF Vulnerability Report. The JSON format of this Vulnerability Report is available only to Assurance customers.
The report lists all the CVEs (Common Vulnerabilities and Exposures) our components may be affected by. All CVEs impacts are assessed or Under investigation.
The reports are updated on a regular basis, driven by bi-weekly monitoring of the CVEs our components may be impacted by.
Vulnerability Reports downloads
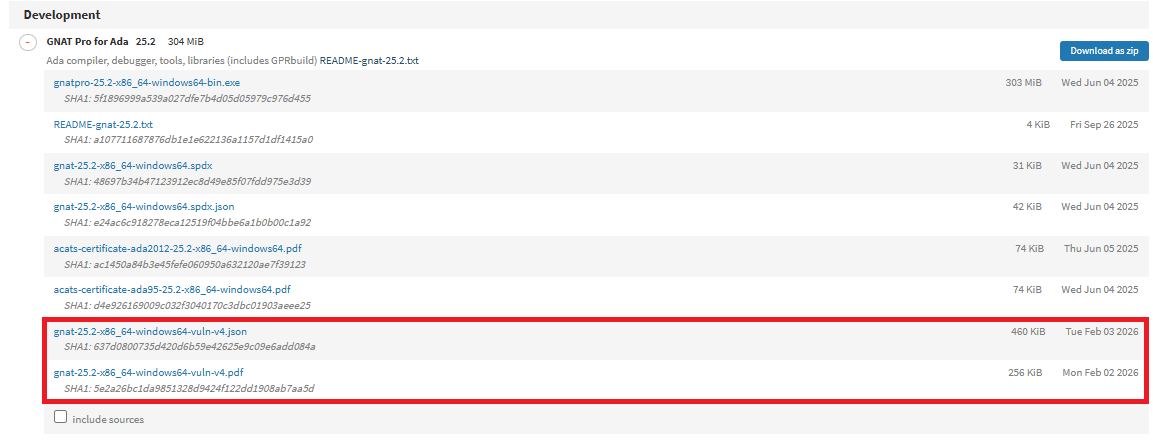
Attestation files
From version 26.1 onward, all our components come with an attached attestations file under JSONL format (JSON Line). This file contains all the signatures to attest the provenance of our components:
A signed provenance file
A signed SBOM (JSON) file (which is the same as the attached SPDX JSON file)
The signed SBOM of each of the source packages used to build the component
Attestations signature check
When selecting the Verify button close to the attestations.jsonl file,
dynamic requests are sent to AdaCore signature service to check all the
signatures of the attestations file.
Checking components signatures
A summary of all the certificates used to sign each element of the attestations file is returned, with a validation status. Each certificate, along with the full report (JSON format) may be downloaded from this dialog.
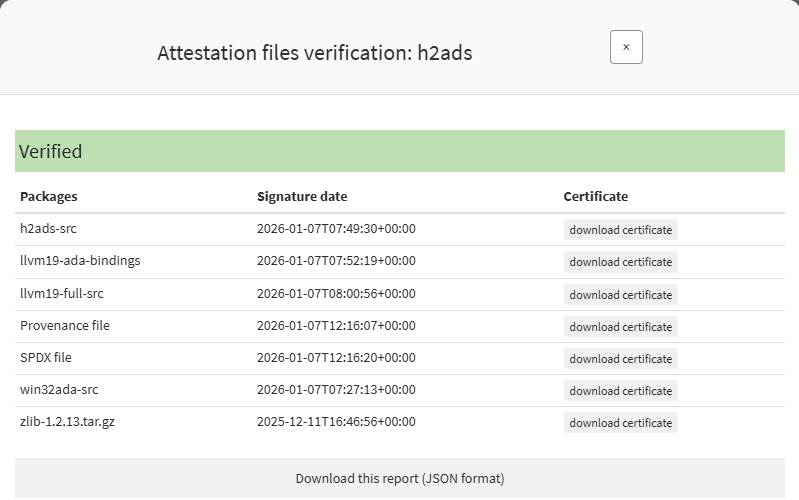
Components signatures report
Provenance file
Getting the content of the provenance file is possible by using the following
python script. First download the attestations.jsonl file to your local
drive, and pass it as the first argument to the following python script:
import base64
import json
import sys

from pathlib import Path

in_path: Path = Path(sys.argv[1])
out_path: Path = Path(
    in_path.parent, in_path.name.replace("attestations.jsonl", "provenance.json")
)

provenance: str = ""
signatures: list[dict[str, str]] = []

with in_path.open() as f_in:
    for line in f_in.read().splitlines():
        obj: dict = json.loads(line)
        if "provenance" in obj:
            provenance = obj["provenance"]["dsse"]["payload"]
            signatures = obj["provenance"]["dsse"]["signatures"]
            break

with out_path.open(mode="w", newline="\n") as f_out:
    json.dump(
        json.loads(base64.b64decode(provenance)), fp=f_out, indent=2, sort_keys=True
    )

print(f"Saved provenance file at {out_path}")
if signatures:
    print("Provenance is signed")
else:
    print("ERROR: Provenance is NOT signed")
A provenance.json file should be created, containing the provenance
information for this component, as specified by
SLSA Provenance specifications version 1.0.
Release Documentation
You can access the documentation for the official AdaCore releases by selecting “Documentation” from the top right menu.
From this page, select the Tool or Product in the upper tabs, then select the version in the dropdown menu. The following information is displayed:
Product Documentation
Release Notes
New Features
Known Problems
GNAT IQ
GNAT IQ is AdaCore’s AI-powered GNAT documentation chatbot. It is designed to help you quickly find information in the documentation, and to provide you with summaries and examples based on the documentation.
You can access GNAT IQ by clicking on the corresponding tile on the main page, or by selecting “GNAT IQ” from the top right menu.
Using GNAT IQ
To use GNAT IQ, simply type your question in natural language the input box located at the bottom of the page and click on the send button (or press Enter). GNAT IQ will process the question and provide you with a response, which should include citations to the documentation sections that were used to answer your question. You can then ask a follow-up question in the same conversation, or click the “New Chat” button to start a new conversation.
Your question does not have to be in English; many other languages are supported.
Previous conversations are shown in a list on the left-hand side of the page: clicking on an entry in this list will display the conversation in the main window and allow you to follow up on it. Hovering on an entry in this list will reveal a button to edit the name of the entry, and a button to delete the corresponding conversation.
There is a button at the top left of the main area that presents a menu with the following options:
Export Markdown: downloads the current conversation to a Markdown file.
Export JSON: downloads the current conversation to a JSON file.
Import JSON: uploads a conversation from a JSON file, which will create a new conversation with the content imported from the file. The JSON file should match the format generated by the “Export JSON” option.
Understanding GNAT IQ’s capabilities and limitations
GNAT IQ is implemented using Retrieval-Augmented Generation. It roughly follows the following pattern:
Your question (along with the conversation preceding it, if any) used to retrieve from an index a list of documentation sections that could be relevant to your question. (A call to a small language model is made to establish this list of sections).
Your question and the top-ranking documentation sections are then sent to a Large Language Model, which generates the response.
GNAT IQ is intended to be used as a convenient way to work with information that is present in the documentation. As such, it should be effective at answering questions like:
Finding something in the manual: “give me the documentation about the SPARK levels”
Summarizing something that might come from different places in the manual and providing examples: “I would like to create a dynamic library in Ada, what are my options? Provide some examples of .gpr files.”
GNAT IQ is not intended to be a general purpose assistant, but instead is meant to focus on working with the documentation.
GNAT IQ is instructed to provide links to the relevant documentation sections and to let you know when it doesn’t have the answer. However, this mechanism is not perfect. Make sure to double-check the answers it provides against the cited documentation.
Documents that are indexed by GNAT IQ
The GNAT IQ index contains the following documents:
The learn site learn.adacore.com;
Most of the manuals that are in the AdaCore live documentation;
The Ada 2022 reference manual.
The index is regenerated regularly. If you find that you are missing a document, please let us know.
Storage of GNAT IQ conversations
GNAT IQ does not store conversations: the conversation history that you see in the interface is stored in your browser’s local storage. If you switch to another browser, you will see a different conversation history.
Important note: if you clear your browser’s local storage, you will lose the conversation history. We encourage you to export conversations you may wish to keep as Markdown or JSON so that you can be sure to be able to review them, even if you change browsers or clear your local storage.
Getting further help
If you have any question on the usage of GNAT IQ, or any feedback in general, please open a case and we will be happy to assist.
Don’t hesitate to attach a conversation export in JSON format if you would like to share this conversation with us.
GNAT IQ Terms of Use
Please read this notice carefully before interacting with GNAT IQ (“GNAT IQ” or the “Tool”) provided by AdaCore. You interact with GNAT IQ through AdaCore’s Support Site as described at 2.3.1 in AdaCore’s Terms.
The Tool that you (“You” or the “User”) will be interacting with is powered by artificial intelligence (“AI”), not a human representative, to help provide answers to questions you may have about AdaCore products and services and the languages supported by those products. It is not a substitute for the professional technical support provided by AdaCore.
GNAT IQ is opt-in: it will not process any information that is not submitted through its interface. At your request, AdaCore can disable access to GNAT IQ on your account. Please send a request to AdaCore’s support team if you opt to do so.
AdaCore and its IT vendors (“IT Service Providers”) will not use User Inputs to train GNAT IQ or any other AI model. AdaCore and its Support Contributors will hold any user data (“User Inputs”) in confidence and will not disclose it to third parties other than to its IT Service Providers as described at 2.5 in AdaCore’s Terms.
By using GNAT IQ, You are providing your explicit consent to and acceptance of these terms (“Terms of Use”) and AdaCore’s Description of Terms Applicable to Subscriptions (AdaCore’s Terms), which includes processing your personal data (“Personal Data”) as described at 2.6 in AdaCore’s Terms. All Personal Data is handled in accordance with AdaCore’s privacy policy and applicable privacy laws.
You may not input into GNAT IQ any material that is covered by the Export Administration Regulations (EAR) of the US Bureau of Industry Standards (BIS), is governed by the US Munitions List (ITAR), or any other similar export-control regulations for military or dual-use goods, or any other form of Controlled Unclassified Information. You shall not use GNAT IQ in violation of the law (including export or intellectual property laws).
GNAT IQ is provided for informational and productivity purposes only. You acknowledge that GNAT IQ is powered by artificial intelligence, which may “hallucinate” or generate technically incorrect, incomplete, or insecure content (“Outputs”). When relevant, AdaCore encourages you to refer directly to the AdaCore documentation cited in the Outputs. Your reliance upon the Outputs is strictly at your own risk. AdaCore does not warrant that Outputs will be error-free. They do not constitute professional or legal advice.
GNAT IQ is made available to you as a Continuous Release. AdaCore shall have no liability for any bugs, system failures, or security breaches resulting from the use of any code included in or adapted from Outputs. You have an independent duty to review, compile, and test all such code in a non-production environment. You are solely responsible for ensuring that any such code complies with your project’s specific coding standards, security requirements, and functional specifications.
Additional features available for Assurance subscriptions
Download Sustained Releases
In addition to the “Release Download”, you can access Sustained Releases by selecting “Sustained Download” from the top right menu. Here is a screenshot of what this download page looks like:
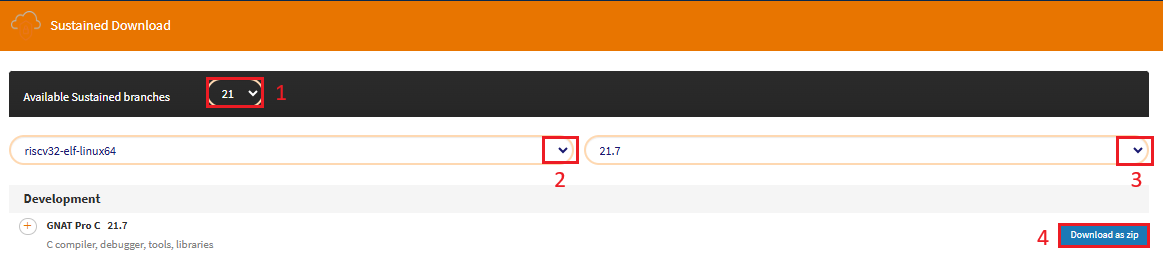
Download Sustained Releases
To download the Sustained Release of your choice:
First, select the corresponding branch,
then the product,
and the version.
Sustained Release documentation
The sustained purpose is to fix critical issues, so the release note is the same for the corresponding .2 release.
In addition, a README.txt is available within each component download.
Documentation is also available in your product’s installation, inside the <install_dir>/share/doc folder, where <install_dir> is the location where you installed your product.
The Known Problems entries for each sustained release are available in the “Sustained Known Problems” page, which is accessible from the top right menu. We will dive into this page’s features in the next subsection.
Use the Sustained Known Problems features
You can access Sustained Known Problems by selecting “Sustained Known Problems” from the top right menu. The screenshot below shows what this page looks like, with some highlights of the various controls available when using this page.
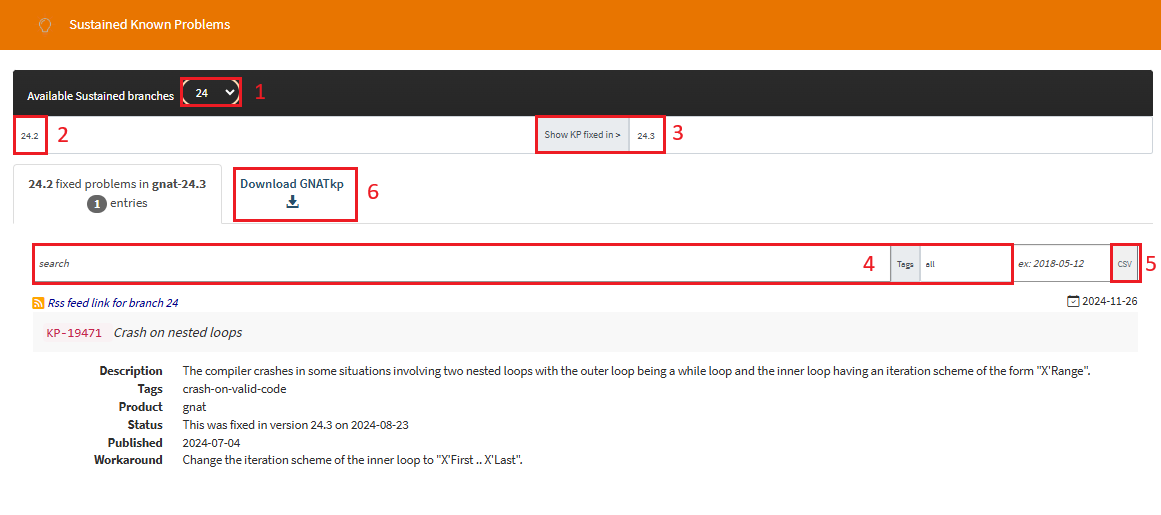
The Sustained Known Problems page
If you would like to get the full list know Known Problems for a given Sustained Release, do the following:
Select the Available Sustained branch using the dropdown menu.
On the left-hand side, select the version you would like the list of Known Problems for;
If you are evaluating the option of going from one Sustained Release to a more recent version of the Sustained Release, you can also use this page to provide you with the list of Known Problems present in the older version and fixed in the more recent version. To do so:
Select the Available Sustained branch using the dropdown menu.
On the left-hand side, select the version of the older Sustained Release;
In the Show KP fixed in field, select the version of the more recent Sustained Release;
For instance, if you are considering migrating from Sustained Release 7.4.2 to Sustained Release 7.4.6, you would select release 7.4.2 on the left hand side, and then select release 7.4.6 in the Show KP fixed in field. The list obtained would include all known problems affecting release 7.4.2, which are now fixed in release 7.4.6.
In addition, there is a search bar enabling you to filter the results, alongside preset tags.
If needed, you can download these results as a .csv file by clicking on the CSV button.
As an Assurance customer, you also have access to a special packaging of GNATcheck called “GNATkp” (GNAT Known Problem detector).
You can download the executable by clicking the “Download GNATkp” button.
Please refer to this documentation to start using our Known Problem Detector: https://docs.adacore.com/live/wave/lkql/html/gnatcheck_rm/gnatcheck_rm/using_gnatcheck.html#using-gnatcheck-as-a-known-problem-detector
Subscription information
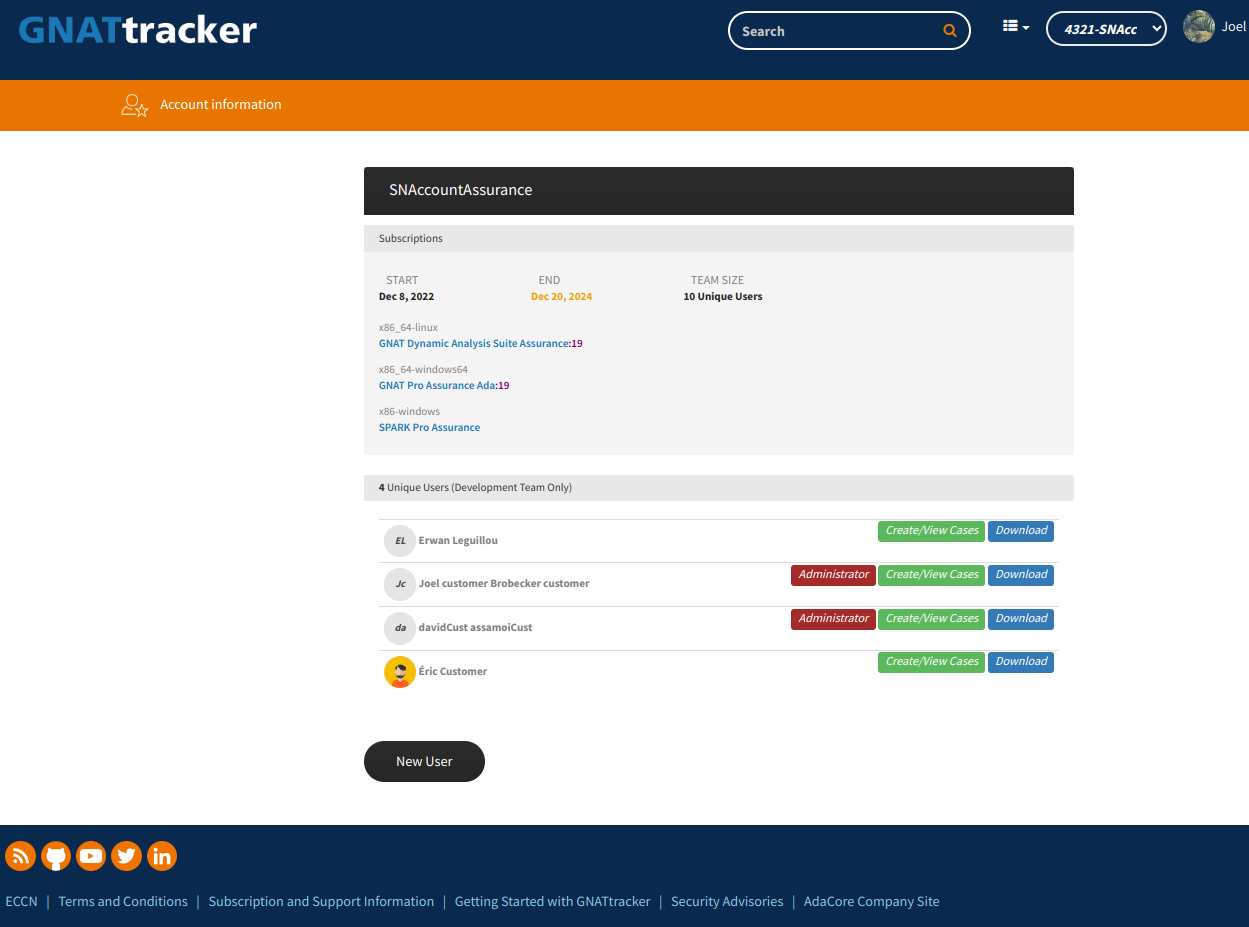
By clicking on the subscription information on the main page, you have access to detailed account information:
The list of subscriptions, with expiration dates.
The list of people who can connect to the portal for your account.
Subscription Information
Subscription Details
Users with the “Administrator” permission also have the ability to manage the list of users, which includes adding new users, modifying the information and permissions of existing users, and deleting users.
To create new users, clicking on the “New User” button at the bottom of the “Account Information” page (shown above). This will take you to a form you can use to create new users:
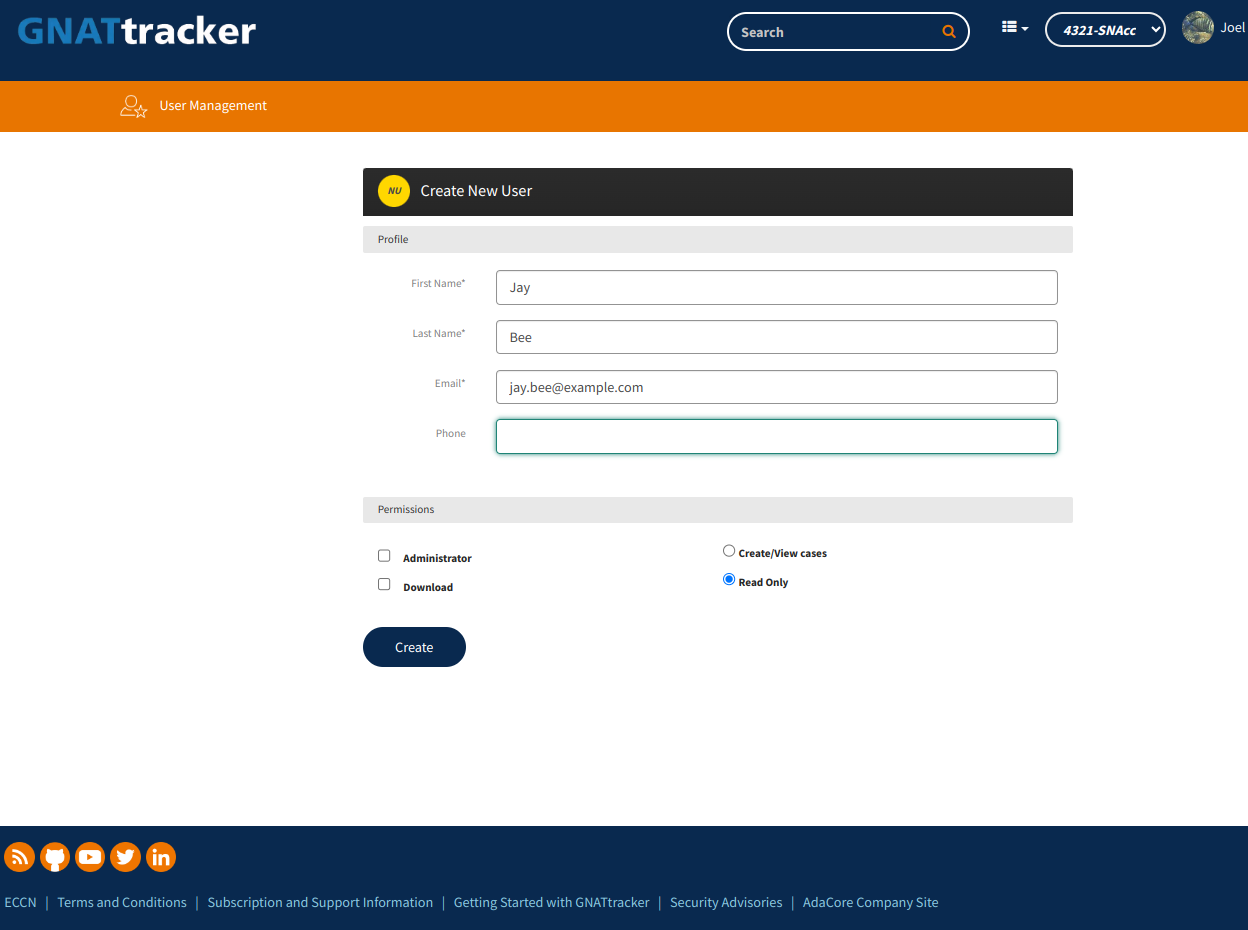
New User creation form
Once filled out, click on “Create” for the new user to be created. The new user can then use the Forgot Password ? link as described above to connect to the portal.
To edit the profile of an existing user, start from the “Account Information” page again, and this time, click on the user itself. This will take you to the following page:
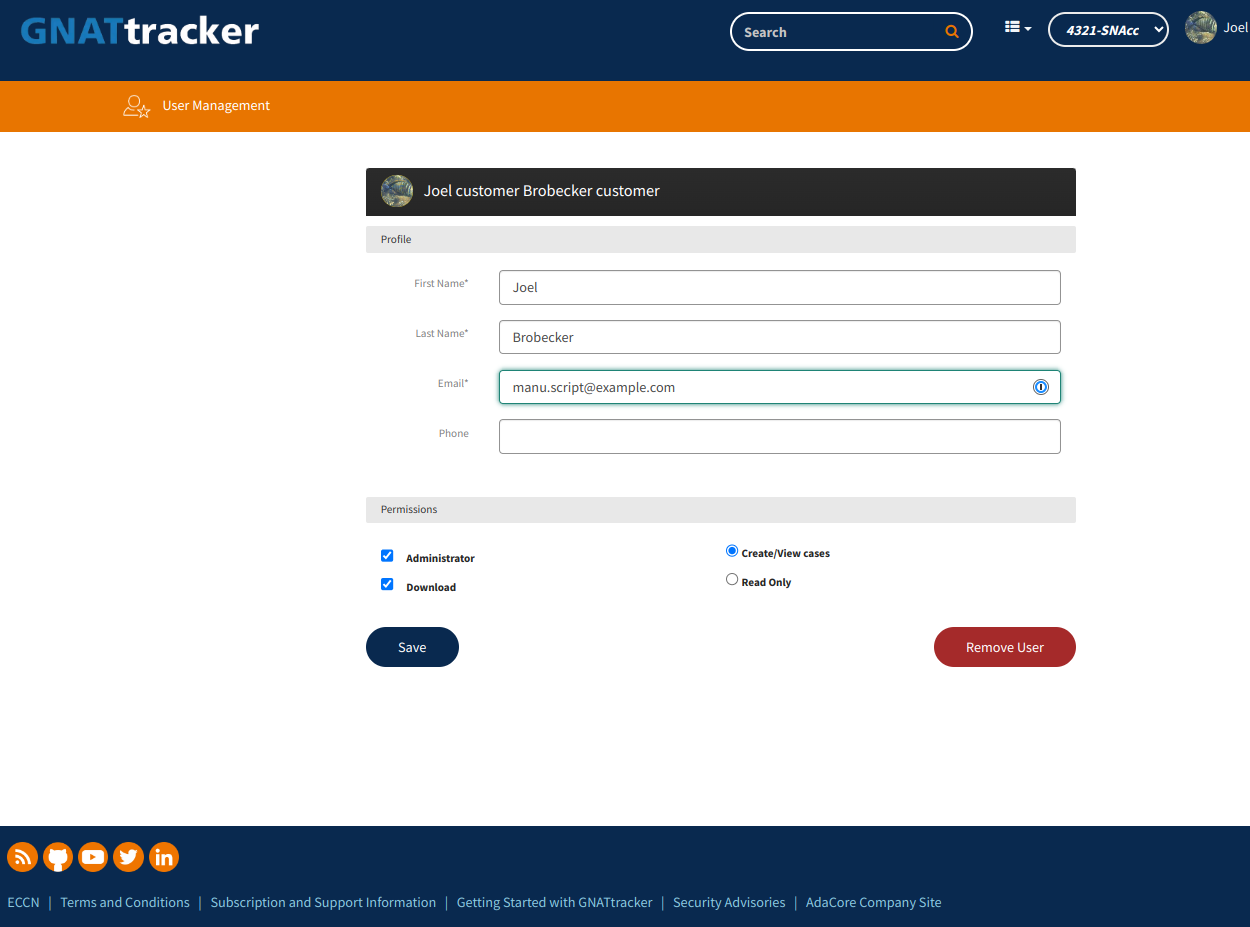
Edit or delete a user
Once the needed changes are made, simply click on “Save”.
The procedure to delete a an inactive user is the same as the procedure for editing a user, except that you need to click on the “Remove User” button instead.