12. Tools
12.1. Coding Standard
Use the Coding Standard menu to edit your coding standard file and run it against your code to verify its compliance with the coding standard. This file is the input to the gnatcheck tool. You can also use the contextual menu to check the conformance of a particular project or source file against a coding standard.
Access the Coding standard editor using the menu. Select either an existing coding standard file or create a new one. The editor adapts itself to the version of gnatcheck on your local machine.
GNAT Studio summarizes the rules currently in use at the bottom of the editor. Once all rules are defined, check the box Open rules file after exit to manually verify the created file. Once you have created the coding standard file, set it as the default coding standard file for a project by going to the project editor, selecting the Switches tab, and specifying this file in the Gnatcheck section.
12.2. Visual Comparison
The visual comparison, available either from the VCS menus or the Tools menu, provides a way to graphically display differences between two or three files or two different versions of the same file.
The 2-file comparison tool uses the standard tool diff,
available on all Unix systems. Under Windows, a default implementation is
provided with GNAT Studio, called gnudiff.exe, but you may want to
provide an alternate implementation, for example by installing a set of Unix
tools such as Cygwin (http://www.cygwin.com). The
3-file comparison tool is based on the text tool diff3,
available on all Unix systems. Under Windows, this tool is not provided
with GNAT Studio, but is available as part of Cygwin.
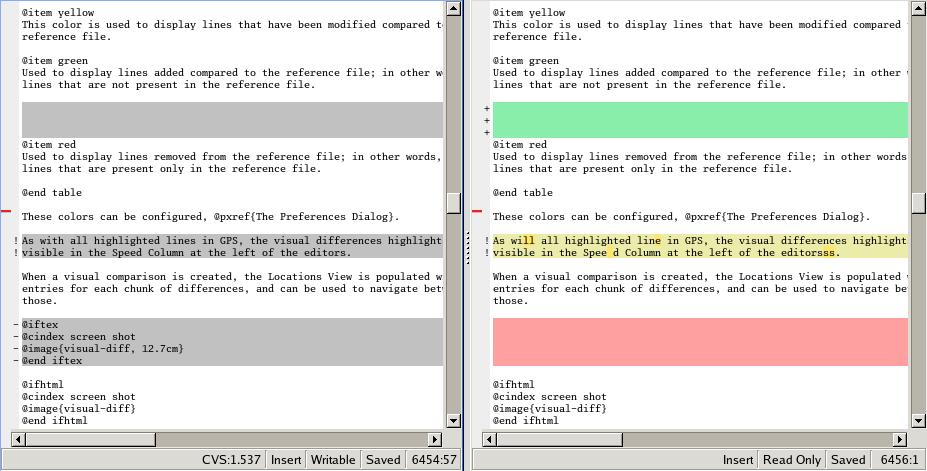
GNAT Studio displays visual comparisons in either Side-by-Side or Unified mode. In Side-by-Side mode, GNAT Studio displays editors for the files involved in the comparison side by side. By default, GNAT Studio places the reference file on the left. In Unified mode, GNAT Studio does not open a new editor, but shows all the changes in the original editor. Unified mode is used only when comparing two files; when comparing three files, only Side-by-Side mode is available.
Lines in the file editors are highlighted with various colors. In side-by-side mode, only the right editor (for the modified file) has different colors. Each highlight color indicates a different type of line:
gray
All the lines in the reference (left) file.
yellow
Lines modified from the reference file. Small differences within one line are shown in a brighter yellow.
green
Lines not originally in the reference file but added to the modified file.
red
Lines present in the reference file but deleted from the modified file.
You can configure these colors in the preferences dialog.
Like all highlighted lines in GNAT Studio, the visual differences highlights are visible in the Speed Column at the left of the editors.
GNAT Studio adds blank lines in one editor in places corresponding to existing lines in the other editors and synchronizes vertical and horizontal scrolling between the editors involved in a visual comparison. If you close one of those editors, GNAT Studio removes the highlighting, blank lines, and scrolling in the other editors.
When you create a visual comparison, GNAT Studio populates the Locations view with the entries for each chunk of differences; use them to navigate between differences.
Editors involved in a visual comparison have a contextual menu Visual diff containing the following entries:
Recompute
Regenerate the visual comparison. Use this when you have modified one of the files in an editor by hand while it is involved in a visual comparison.
Hide
Remove the highlighting corresponding to the visual comparison from all involved editors.
Close editors
Closes all editors involved in this visual comparison
Use this editor as reference
Make this editor the reference (this is only present when displaying a visual comparison involving 3 files).
12.3. Code Fixing
GNAT Studio provides an interactive mechanism to correct or improve your source code based on error and warning messages generated by the GNAT compiler. This capability is integrated with the Locations view (see The Locations View): when GNAT Studio can make use of a compiler message, it adds an icon on the left of the line.
If a wrench icon is displayed and you left-click on it, the code is fixed automatically, and you will see the change in the corresponding source editor. This occurs when a simple fix, such as the addition of a missing semicolon, is sufficient to resolve the error.
Right-click on the icon to display a contextual menu with text explaining the action that would be performed on a left-click. Displaying a contextual menu anywhere else on the message line provides an option called Auto Fix, giving you access to the same information. For the previous example of a missing semicolon, the menu contains an entry labeled Add expected string “;”. You can choose to Apply to this occurrence or Apply to all similar errors. The latter option applies the same simple fix to all errors that are the same, based on parsing the error message. The wrench icon is removed once the code change has been made.
For more complex errors where more than one change is possible, GNAT Studio displays a wrench icon with a blue plus sign. Clicking the icon displays a contextual menu listing the possible fixes. For example, this is displayed when an ambiguity in resolving an entity is reported by the compiler.
Right-clicking on a message with a fix opens a contextual menu with an entry Auto Fix. Fixes that can be applied by clicking on the wrench are also available through that menu. In addition, if GNAT Studio considers one of the fixes to be safe, it provides additional menu entries to apply fixes at multiple locations:
Fix all simple style errors and warnings
Offered only when the selected message is a style warning or error. Fixes all other style warnings and errors for which a unique simple fix is available.
Fix all simple errors
Fixes all errors messages for which a unique simple fix is available
12.4. Documentation Generation
GNAT Studio uses the GNATdoc tool to generate documentation from source files. See GNATdoc User’s Guide for more information about this tool, including comment formatting and possibilities for customization.
Invoke the documentation generator from the menu:
Generate Project
Generate documentation for all files in the loaded project.
Generate Projects & Subprojects
Generate documentation for all files in the loaded project and its subprojects.
Generate current file
Generate documentation for the current file.
12.5. Working With Unit Tests
GNAT Studio uses gnattest, a tool that creates unit-test stubs as well as a test driver infrastructure (harness). It can generate harnesses for a project hierarchy, a single project or a package. Launch harness generation process from the menu or a contextual menu.
After a harness project has been generated, GNAT Studio switches to it, allowing you to implement tests, compile and run the harness. You can exit the harness project and return to original project at any point.
12.6. Metrics
GNAT Studio provides an interface to the GNAT software metrics generation tool gnatmetric. Metrics can be computed for one source file, the current project, or the current project and all its imported subprojects
Invoke the metrics generator from the menu or the contextual menu.
12.6.2. The Contextual Menu
When relevant to the context, right-clicking displays metrics-related contextual menu entries. The contextual menu for a source file has an entry Metrics for file that generates the metrics for the current file. The contextual menu for a project (see The Project view) has an entry Metrics for project that generates the metrics for all files in the project.
After computing the requested metrics, GNAT Studio displays a new window in the left area showing the computed metrics in a hierarchical tree form, arranged first by files and then by scopes inside the files. Double-clicking any of the files or scopes opens the corresponding source location in the editor. GNAT Studio displays any errors encountered during metrics computation in the Locations view.
12.7. Stack Analysis
GNAT Studio provides an interface to GNATstack, the static stack
analysis tool. This interface is only available if you have the
gnatstack executable installed and available on your path. GNAT Studio
computes, loads, and visually displays stack usage information for the
entire project hierarchy. You can enter stack usage information for
unknown and unbounded calls within GNAT Studio.
Once computed and loaded, GNAT Studio summarizes the stack usage information in a report and uses it to annotate source code with stack usage annotations. The largest stack usage path is loaded into the Locations view. See The Locations View.
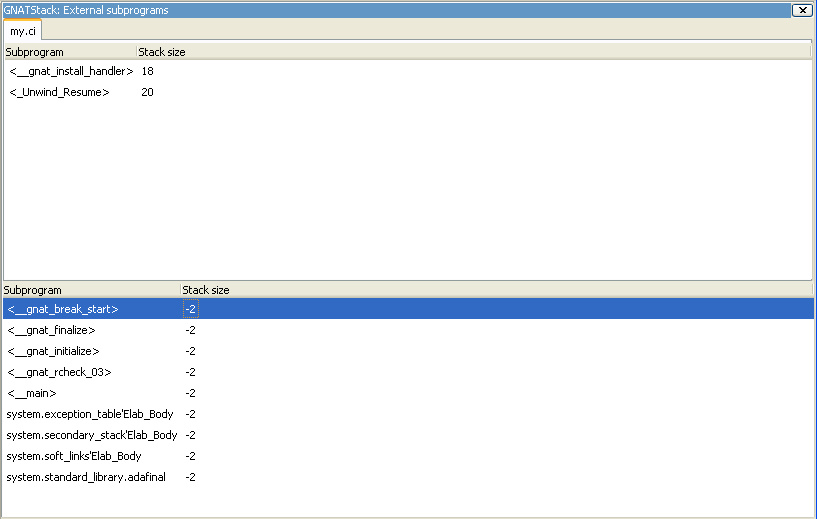
Specify stack usage information for undefined subprograms by adding one or
more .ci files to the set of GNATStack switches in the Switches
attribute of the Stack package of your root project. For example:
project P is
   package Stack is
      for Switches use ("my.ci");
   end Stack;
end P;
You can also use The Stack Usage Editor to edit stack usage information for undefined subprograms.
12.7.2. The Contextual Menu
The contextual menu for a project, file, or subprogram entity (including the entities listed in the coverage report) has a Stack Analysis submenu containing the following options, depending on the type of entity selected:
Show stack usage
Show stack usage information for every subprogram in the currently selected file.
Hide stack usage
Hide stack usage information for every subprogram in the currently selected file.
Call tree for xxx
Open the Call Tree view for the currently selected subprogram.
12.7.3. The Stack Usage Report
Once GNAT Studio has loaded the stack usage information, it displays a report containing a summary of the stack analysis.
12.7.4. The Stack Usage Editor
The Stack Usage Editor allows you to specify the stack usage of undefined subprograms so these values can be used to refine results of future analysis.
The Stack Usage Editor contains two main areas. The notebook on the top allows you to select the file to edit. It displays the contents of the file and allows you to enter or change the stack usage of subprograms in it. The table in the bottom area displays all subprograms whose stack usage information is not specified and allows you to set them.
Specify the stack usage information for subprograms by clicking in the stack usage column to the right of the subprogram’s name. When you specify a value in the bottom table, the subprogram is moved to the top table of the currently selected file. When a negative value is specified, the subprogram is moved to the bottom table.
GNAT Studio saves all changes when the stack usage editor window is closed.
12.8. The automatic code reducer
GNAT Studio ships with the gnatstudio_cli command-line tool which can reduce an Ada code base. You can use this tool to obtain a small reproducer which shows a particular issue.
The way this tool works is by removing statements from the Ada closure of a project, while preserving a given set of properties (the “oracle”), in a way that preserves the validity of the Ada code as much as possible.
12.8.1. Collecting the project in a sandbox area
The automatic reducer will edit files in place. If you don’t want to break your development environment, you might want to copy the sources and work in a sandbox area. The GNAT Studio menu Analyze -> Automatic code reducer -> Collect sources in Sandbox project can do this and collect all Ada sources in the project closure within a given directory.
12.8.2. Writing an oracle script
To use this tool, you’ll first need to write an oracle script. This is a script that returns with an error code 0 if the property of interest is observed, and nonzero otherwise.
For instance, if the property being tested is that the program should print “hello”, the oracle script should first build the project, returning nonzero if the project does not build, then run the program, and return zero if the output of the program is “hello”.
The oracle script is going to be invoked repeatedly in the same area, so you will need to ensure that it is not influenced by leftovers from previous invocations.
This script might be called more than once per second, so make sure its behavior supports this. For instance, if this script uses gprbuild to build the project, you will need to pass the option -m2 so that the checksums of files, rather than the timestamps, are taken into account when determining whether to rebuild.
The speed of this script has a strong influence on the overall speed of the reducer, so it’s worth taking the time to optimize the oracle script. For instance, if the property to preserve is “the program should print hello”, then it might help to add a call to grep to verify that the word “hello” is present in the sources: this will allow the reducer to quickly eliminate bad candidates without having to take time to compile them.
You can test your oracle script from GNAT Studio, with the menu Analyze -> Automatic code reducer-> Test the Oracle script
If your goal is to create a reduced reproducer of a compiler warning, error or bug, your oracle must be written to check for the exact message that you are expecting and not just a non-zero exit code of the build command. That’s because the build might end with a non-zero exit for a wide variety of reasons that don’t relate to the problem you are investigating.
For example, if your oracle only checks for a non-zero exit code, the automatic code reducer will start by removing the source files one by one until all source files are removed. This empty set of sources satisfies the oracle because building a project with no sources will indeed result in a non-zero exit code. But this of course does not help your investigation.
Instead, the oracle should look for an exact message, for example:
# oracle.sh
gprbuild -m2 -P <your project> 2>&1 | grep "GNAT BUG DETECTED"
Note that 2>&1 is necessary to redirect the standard error stream to the
standard output so that it may be processed by grep.
Finally, if you know that the compiler issue occurs on a specific source file, it may be interesting to add build flags to compile only that source file which would make the oracle more efficient. For example:
# oracle.sh
gprbuild -m2 -P <your project> -c my-problematic-file.adb 2>&1 | grep "GNAT BUG DETECTED"
12.8.3. Running the reducer
The command line has the following format:
gnatstudio_cli adareducer -P<your project> -s <your oracle script>
You can launch this from GNAT Studio with the menu Analyze -> Automatic code reducer-> Launch Automatic Reducer