4. Creating and Configuring Projects
4.1. Importing Existing GNAT Projects
Importing existing GNAT projects (i.e., those defined by a GNAT project file) is accomplished using a GNATbench wizard. The wizard handles all the configuration details required to make the existing GNAT project into a GNATbench project.
Note that the GNATbench project import wizard cannot handle absolutely any arbitrary existing GNAT project. There may be complex configurations controlled by scenario variables, for example, that prevent a full import. In such a case the best approach is to import the project with the Eclipse project importing wizard, do any manual setup steps not handled by that wizard, and then convert the project to a GNATbench project using the Converting Existing Projects To GNATbench .
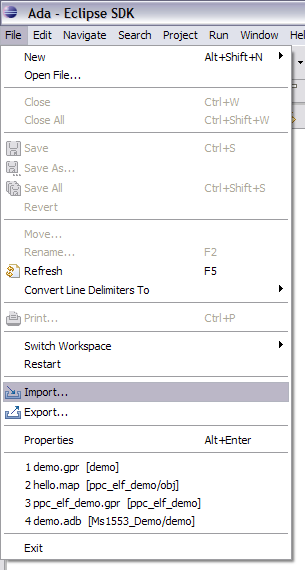
To invoke the wizard you may use either the “File” menu and select “Import…”, or use the contextual menu in the Navigator and again select “Import…” The first approach is illustrated below.
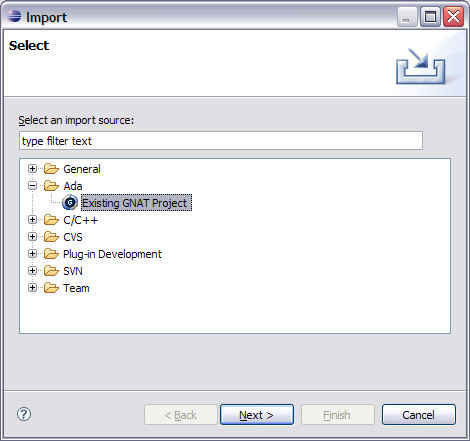
A new wizard page will appear (shown below), allowing you to choose which import wizard to apply. Workbench defines a number of import wizards so you may need to expand the “Ada” category. Select “Existing GNAT Project” and press Next.
The next wizard page appears (see the following figure) and requests the location of the GNAT project file defining the project to be imported. You may either enter the path manually or browse to it via the “Browse” button to the right of the text entry pane.
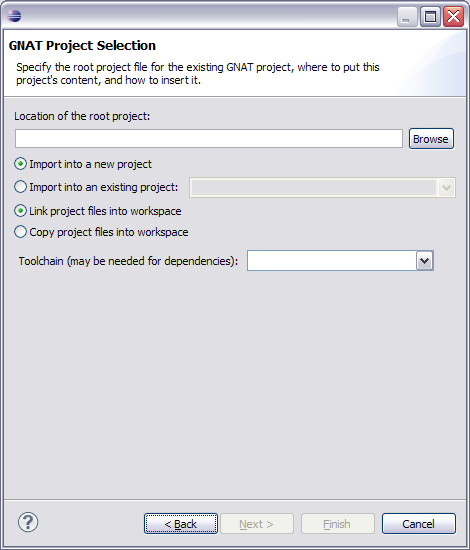
On that same page you also choose whether to import the GNAT project into an existing Eclipse project or into a new Eclipse project. Typically you will create a new project rather than import it into an existing project.
That page also offers the choice of whether to copy the files and folders of the GNAT project into the Eclipse project or only create links to the existing files and folders. Creating links does not make a copy of the files, but rather, creates transparent references to all the project resources in the file system outside of the Eclipse workspace. Changes to the files, compilation, and deletion within Eclipse will directly affect the files and folders in the external file system when the linking option is taken.
Additionally, you can select the toolchain to be used by the imported project. This selection may be required for the sake of proper handling of “dependent projects” – other projects referenced by the imported project via “with clauses”. If no dependencies exist, or they will be found by default, the toolchain can be left unspecified here.
Press Finish after making all these choices. The new project will be created for you.
Note that you may have to modify the GNAT project file created by the wizard. For example, you might need to re-specify the location of the executable (a directory) if the original GNAT project file specified it with an absolute path. Similarly, the GNAT project file might specify multiple main programs or other properties that should be changed.
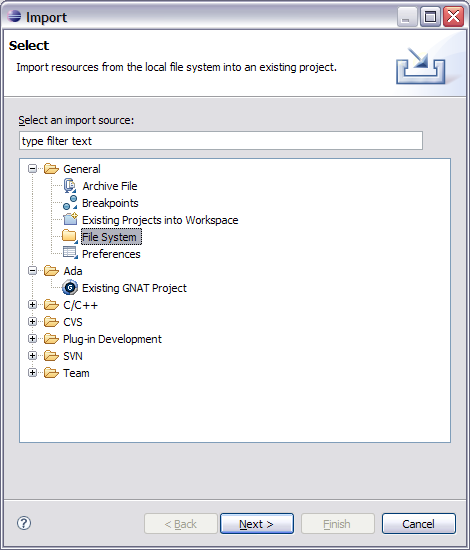
You might also need to use the Eclipse-defined import wizards to import additional folders and files. Use the “File System” option under the “General” wizard category to invoke these wizards:
4.2. Creating New Projects
Creating a new project for Ada development is easy with the dedicated GNATbench wizard.
4.2.1. Invoking the New-Project Wizard
There are many ways to select and invoke the GNATbench new-project wizard. See Ada Perspective Wizards for illustrations of all the different methods.
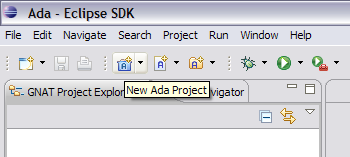
Perhaps the easiest way to invoke the wizard is to click on the down-arrow next to the “New Ada Project” icon on the toolbar, as shown below:
4.2.2. Walking Through the Wizard Pages
However you invoke the wizard, the first page of the wizard will appear. Note that all of the dialog box options and entries on a given page may not be visible if you resize the dialog box of the previous page. If so, simply enlarge the box.
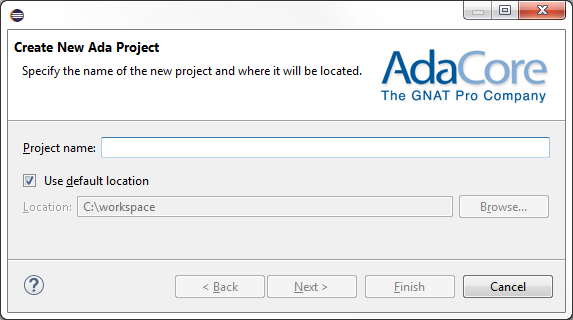
4.2.2.1. Create New Ada Project page
In the first page you always specify the name of the new project and choose where the new project will reside. Typically this location will be the workspace so you can take the default, but otherwise you can specify an external location on the file system.
4.2.2.2. GNAT Project Unit Name page
In the next wizard page you specify:
the unit name of the GNAT project. This is not the name of the file, also known as the “gpr file.” Rather, it is the name of the unit inside the gpr file. The name you enter is displayed within a project unit declaration in a text frame, as you enter it, to make clear the use for the name requested.
the GNAT project type. It can be a single project or a library project if you want to generate a static or dynamic (relocatable) library.

The unit name need not be the same as the Eclipse project name, but it must be a legal Ada identifier. An error is indicated in the wizard page if this is not the case for the name you enter. The wizard will attempt to convert the Eclipse project name into a legal Ada identifier but might not succeed. In that case you must manually change the name, but, again, the unit name can be different from the Eclipse project name.
If you ask to create a library project, pressing Next will take you to the Ada Library Settings page.
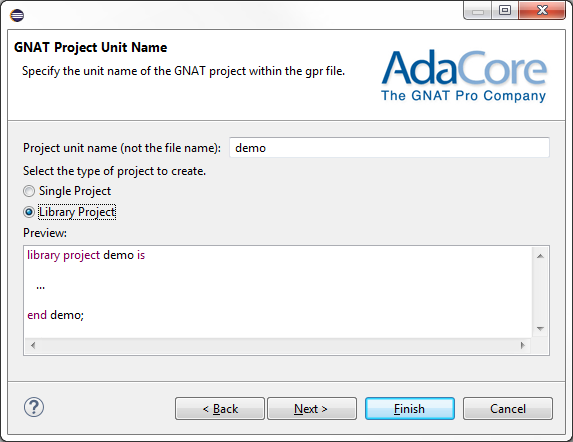
If you ask to create a single project, pressing Next will take you to the page shown below, where you specify information about the Ada main subprogram and make source code generation choices.
4.2.2.3. Ada Main Program Settings page
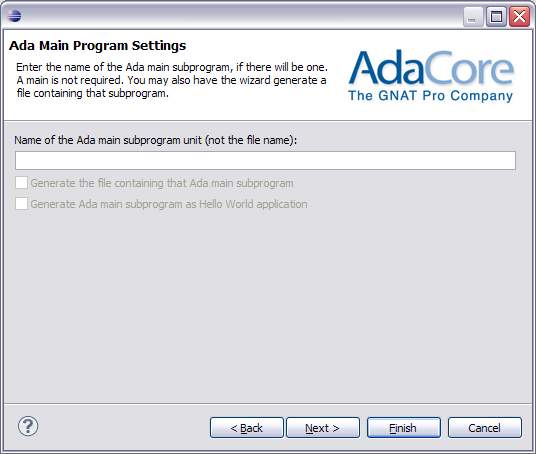
First comes the text entry box where you specify the unit name of the Ada main subprogram, if there is to be one. Note that this is the name of the subprogram, not the name of the file, so an extension is neither expected nor allowed. The field is not required because a main subprogram is not required for an Ada project. For example, if you are creating a library project a main unit is not expected.
The first option offered on the page is whether you want the wizard to generate a file containing the main subprogram on your behalf. If you do, the wizard will generate it with the unit name you specify. If no unit name is specified the option is disabled.
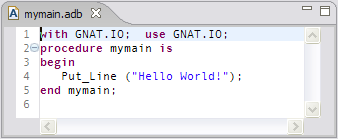
The next option, enabled if the first option is chosen, specifies whether this generated main subprogram implements the “hello world” application. This capability is purely for your convenience so that you can immediately have an “interesting” program to build and debug immediately after creating a new project. If chosen, the subprogram will look like the following (assuming the unit name is “mymain”):
If you do not enable the “hello world” option, the generated main subprogram will have a null statement body.
Pressing Next will take you to the Directories Settings page
4.2.2.4. Ada Library Settings page
This page allows to configure the following library project attributes:
Library_Name
Library_Dir
Library_Kind
Library_ALI_Dir
Library_Version
Externally_Built
Use tooltips to get documentation about these attributes or open GPRbuild and GPR Companion Tools User’s Guide A copy should be available in “GNATbench Additional Guides” from Help contents menu.
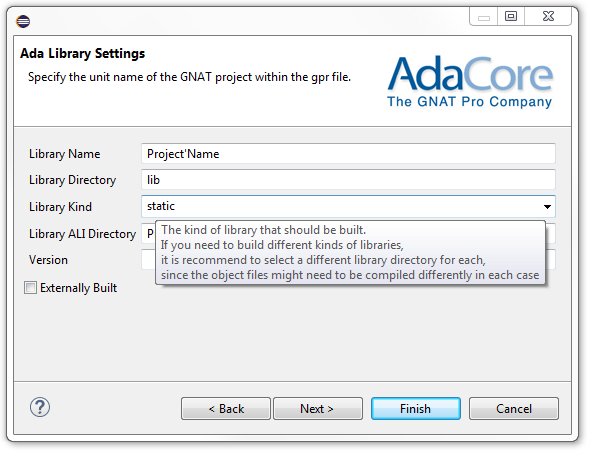
Pressing Next will take you to the page shown below to finish to configure the library.
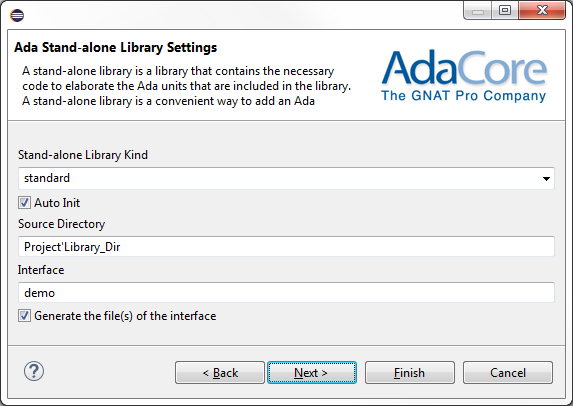
4.2.2.5. Ada Stand-alone Library Settings page
This page allows to configure the following library project attributes:
Library_Standalone
Library_Auto_Init
Library_Src_Dir
Library_Interface or Interfaces
Set Stand-alone Library Kind to no if your library should not be stand-alone.
Keeping “Generate the files(s) of the interface” checked generates empty specification files.
package demo is
   pragma Pure;
end demo;
4.2.2.6. Directories Settings page
The next page allows you to specify directories to contain sources, intermediate products (object files and ali files), and the executable. By default, the executable is placed in the same directory as the intermediate products. Append “/**” to source files folder to include subdirectories.

4.2.2.7. Ada Builder Settings page
The next page is dedicated to the builder.
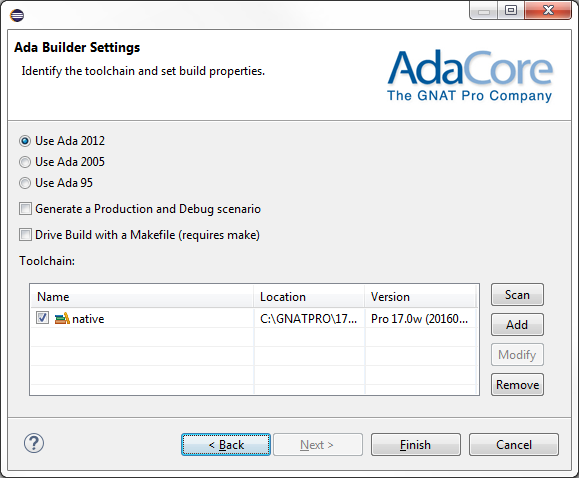
The first of these configuration choices concerns whether you want to compile using Ada 2012, Ada 2005 or Ada 95.
The next configuration choice determines whether to define two different build scenarios: one scenario for debugging and one for production. If enabled, a scenario variable will be defined to support these two situations, with appropriate switches set in the generated project file.
The next configuration choice determines whether the “make” utility, and associated Makefile, will be used to drive the build. If not enabled, no Makefile will be generated and none will be used to drive the build.
The name of the “make” utility can be changed using the “Ada - External Commands” preferences page. The preferences dialog is accessible via the Window->Preferences menu group.
Next you select the Ada toolchain to use. You select the name from the list of currently installed GNAT toolchains recognized by GNATbench, or you can define a toolchain manually.
The list of currently installed builders may be incomplete when the dialog box is first displayed so you may need to update the list. To do so, press the “Scan” button. A notification dialog box will appear while GNATbench scans the machine for installed GNAT toolchains. When the notification disappears the list will have been updated with all installed GNAT toolchains. Put a check-mark next to the required toolchain, if it is not already selected, and press Finish.
Note that you can select multiple toolchains for a given project simply by placing a check-mark next to each required toolchain.
However, instead of selecting one of these toolchains you can create a new one, either by selecting from a predetermined list or by defining a completely new one “from scratch.” To do so, press the “Add” button, which will result in another dialog box appearing, as shown below:
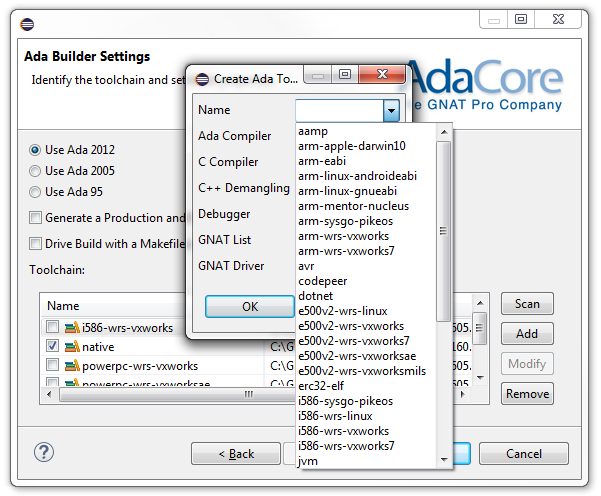
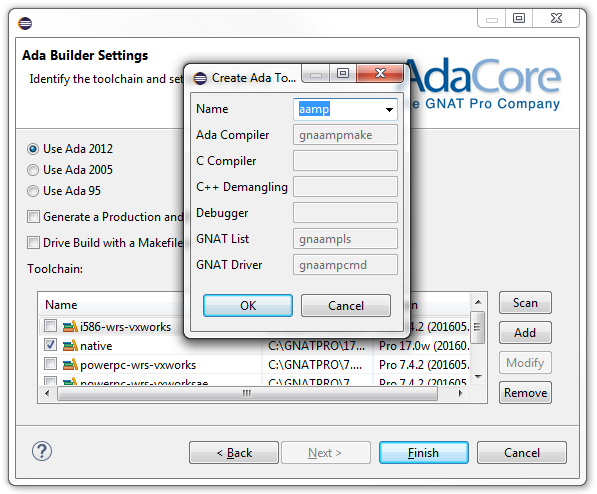
You can select a toolchain from the pull-down list and, in that case, the other fields will be filled in automatically (and cannot be changed), as indicated by the following figure:
Alternatively, you can specify a completely new toolchain. You are required to enter the actual commands that GNATbench will invoke when using this toolchain. The corresponding text entry boxes become enabled, as shown in the following figure:
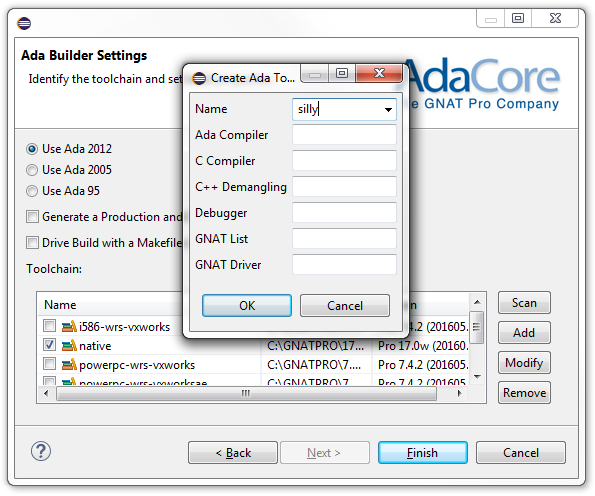
Specifically, you must enter the name of the toolchain and the invokable names of the Ada compiler, the GNAT driver, and the “GNAT List” command. The names for the C compiler and the C++ demangler, on the other hand, are optional.
Omitting the required values will result in a problem indicator appearing next to the new toolchain name in the list of all toolchain names. See the figure below for example.
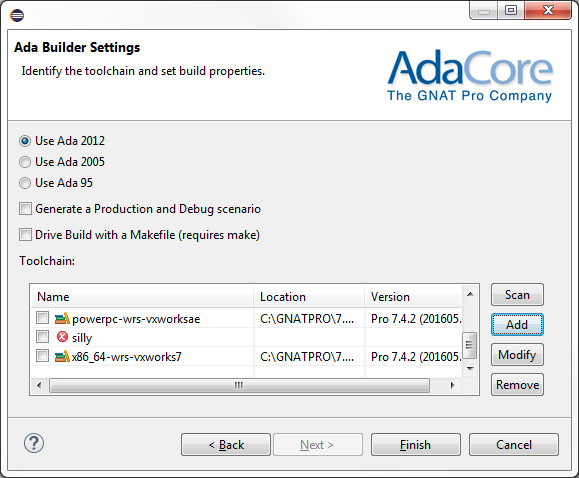
Note that you can modify a user-defined toolchain using the “Modify” button.
Toolchain definitions persist. You can remove them via the “Remove” button.
Once all the required entries are made you can then press Finish and the new project will be created for you.
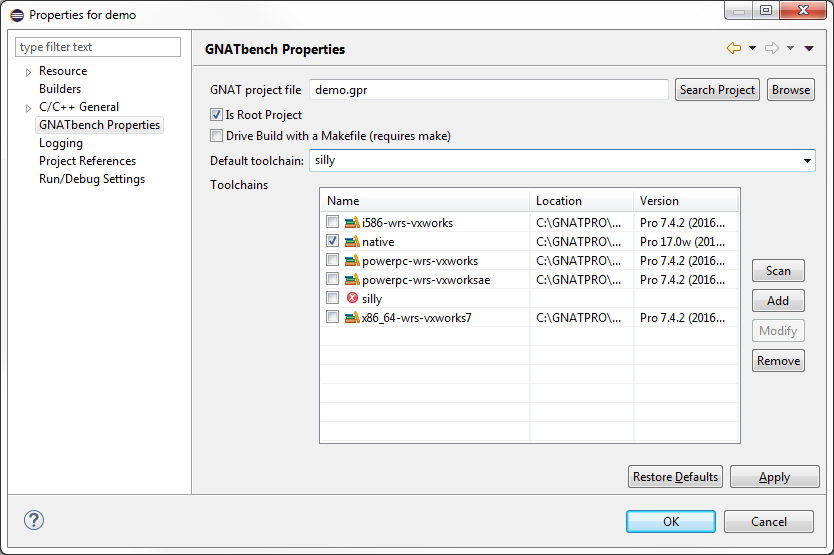
At any time after the new project wizard completes, you retain the option of selecting and modifying the selected toolchains for the project. To do so, select the Properties menu entry for the project and then select the “GNATbench Properties” page. There you will see a similar interface to the last page of the wizard:
4.3. Creating New Ada Source Files
There are two wizards defined for creating new files. One wizard creates a new Ada source file and (optionally) inserts a header comment block at the top. Another wizard creates a “basic” file and in fact this wizard is just the standard Eclipse “new-file” wizard, provided here for convenience. We describe the Ada Source File wizard below.
4.3.1. Invoking the New-File Wizards
There are many ways to select and invoke the GNATbench wizards. See Ada Perspective Wizards for illustrations of all the different methods.
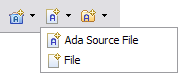
Perhaps the easiest way to invoke one of these new-file wizards is to click on the down-arrow next to the GNATbench new-file icon on the toolbar, as shown below, and select from the list. Clicking directly on the icon will invoke the “Ada Source File” wizard.
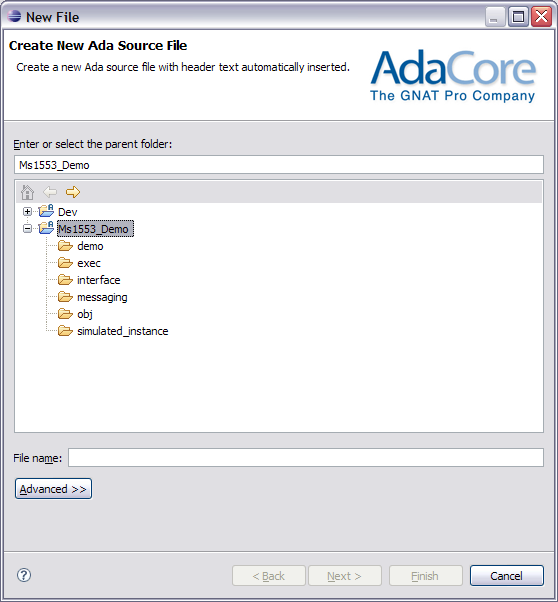
4.3.2. New Ada Source File Wizard
The “Ada Source File” wizard will automatically insert the content of a header file if the corresponding preference is enabled. Different header files can be inserted for specs and for bodies; selection is determined by the file name extension.
Like the standard new-file wizard, you choose the parent folder for the file and specify the name of the new file, including extension.
4.3.3. Linked Source Files
In the figure above, the “Advanced” button expands the dialog box to allow creating a source file that is linked to an existing file in the file system. This option is not currently supported and should not be used. (Linked folders are supported, however.)
4.3.4. Header Text Insertion
See the Editor preference page for the preference controlling whether the header text is inserted and for the paths to the files containing the text. The preference is disabled by default.
The header file preferences are intended to designate regular text files containing text capable of being processed by an Eclipse text editor.
Separate text headers are possible for declaration and body files because separate file paths are provided in the preferences. However, there is no requirement that they be different so you can simply specify the same file in both preferences to have the same header text inserted.
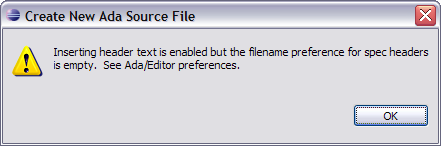
When the preference to insert the header is enabled but no file(s) containing the header text is also specified, the file is still created but the following dialog box will pop up, explaining why no text was inserted (this sample is for specs):
Note that if the overall enabling preference is checked, both file preferences must be specified (one each for both spec and body files). However, if only one kind of file should have a header inserted, simply specify the name of an existing empty file for the other preference.
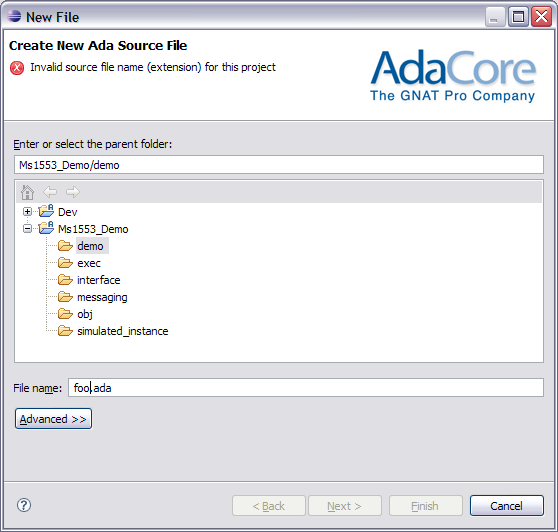
4.3.5. File Naming Conformance
The wizard ensures that the new file’s proposed extension is valid for the given project’s source file naming scheme. For example, the following figure shows the error message displayed when the default GNAT naming scheme is in effect for the given project. Once a valid name is specified, the Finish button will be enabled.
4.4. Creating New Ada Source Folders
There are two wizards defined for creating new folders. One wizard creates a new Ada source folder and “inserts” it into the GNAT project file. Another wizard creates a regular folder and in fact this wizard is just the standard Eclipse “new-folder” wizard, provided here for convenience. We describe the Ada Source Folder wizard below.
4.4.1. Invoking the New-Folder Wizards
There are many ways to select and invoke the GNATbench wizards. See Ada Perspective Wizards for illustrations of all the different methods.
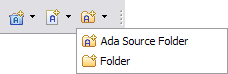
Perhaps the easiest way to invoke one of these new-folder wizards is to click on the down-arrow next to the GNATbench new-folder icon on the toolbar, as shown below, and select from the list. Clicking directly on the icon will invoke the “Ada Source Folder” wizard.
4.4.2. New Ada Source Folder Wizard
Like the standard new-folder wizard, this Ada wizard lets user create nested folders, but in addition the wizard automatically adds the new folder to the Source_Dirs attribute in the GNAT project file (the .gpr file) so that contained sources will be included in builds.
You specify the parent to contain the new folder and specify the new folder name. The “Advanced” button allows creating a linked folder.

4.5. Converting Existing Projects To GNATbench
Converting an existing Eclipse project for Ada development with GNATbench is easy with the GNATbench project conversion wizard.
The wizard offers three alternative conversion approaches. You can apply a GNAT project file (a “gpr file”) found within the existing Eclipse project being converted, you can import an existing GNAT project file located elsewhere, or you can create a new GNAT project file and GNATbench resources as part of the existing Eclipse project. The latter two approaches invoke the GNATbench import and new-project wizards, respectively.
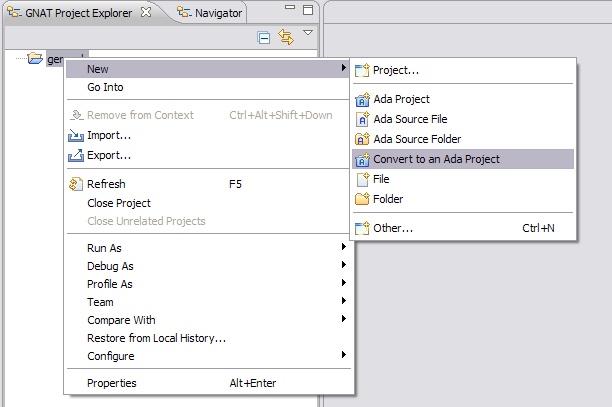
To invoke the conversion wizard, right-click on the existing project node in the GNAT Project Explorer, choose “New” and then “Convert to an Ada project.” In the figure below, a “general” Eclipse project has been created and is now being converted:
In the resulting page you select the existing Eclipse project to be converted. By default the previously selected project is already specified. You also select the GNAT project file (the “gpr file”) to be used once the project is converted.
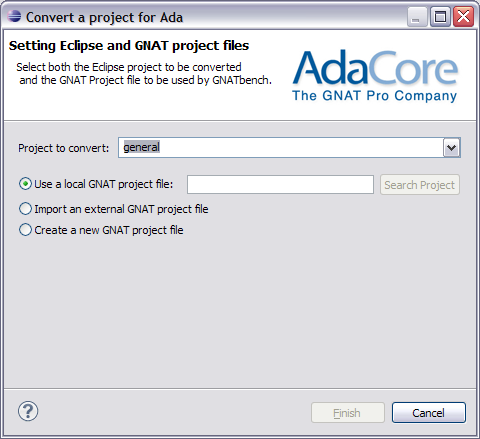
Your choice for the GNAT project file determines whether more wizard invocations are required.
If you choose to apply an existing GNAT project file located in the project being converted, once you have specified the file (in the text entry pane) you can then simply press Finish. The existing local project file will be applied and the conversion wizard completes. This might be the situation when an Eclipse project is first checked out from a configuration management system, for example.
Alternatively, you can choose to import an external GNAT project file. In that case, when you press Finish the GNAT project import wizard will execute. The imported GNAT project file and associated resources will be used in the converted project. See Importing Existing GNAT Projects for the details of that wizard. As noted there, you should only use the import wizard for comparatively simple GNAT projects. For GNAT projects that are too complex to be imported successfully, you should do the manual setup yourself and then use one of the other two conversion options presented here.
Finally, you can choose to create a new GNAT project file. In that case when you press Finish the GNATbench New Ada Project wizard will execute. See Creating New Projects for the details of that wizard. The newly created GNAT project file and other resources (such as source and object folders) will be created as part of the existing project being converted.
4.6. Using Non-Default Ada Source File Names
By default, GNAT compilers require a specific Ada source file naming convention. In this default convention, “spec” files (those containing declarations) have an extension of “.ads” and “body” files (those containing completions) have an extension of “.adb” (i.e., ‘s’ for “spec” and ‘b’ for “body”).
GNATbench uses the convention for a given project when displaying and operating upon source files. For example, double-clicking on a file invokes the Ada language-sensitive editor only if the file has an extension indicating that it is indeed a source file. Similarly, only those files recognized as source files are displayed in source folders within the GNAT Project Explorer.
You can change the default Ada source file naming convention used by any given project.
To make the change requires two steps:
You must specify the new naming scheme in the GNAT project file (the “gpr file”), and
You must associate the file extension with the AdaCore language-sensitive editor within Eclipse itself.
4.6.1. Specifying the Naming Scheme In the Project File
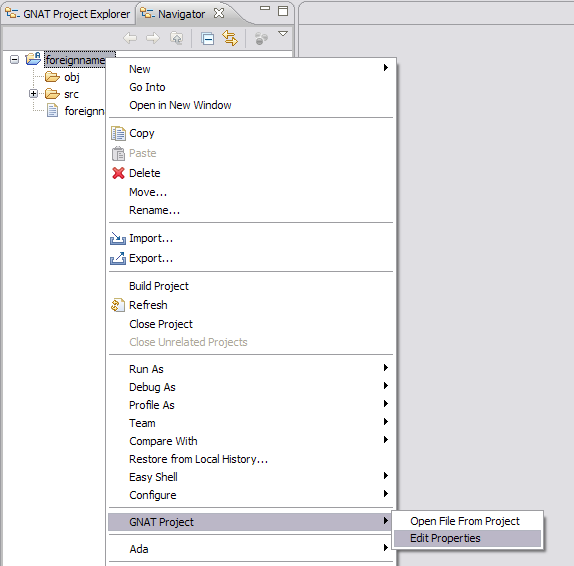
For the first step, you can use the GUI dialog to specify the naming scheme in the project properties. To invoke the dialog, right-click on the project node in the GNAT Project Explorer, select “GNAT Project”, then select “Edit Properties” as shown below. Note that the first time you invoke the dialog it may take a little while to appear.
In the resulting dialog, select the Naming tab:

There are a few alternative naming schemes already defined. Active the pull-down menu to see these alternatives. If one of them matches your scheme you simply select that scheme and press OK to finish. Press OK when asked if you want to save the project file changes.
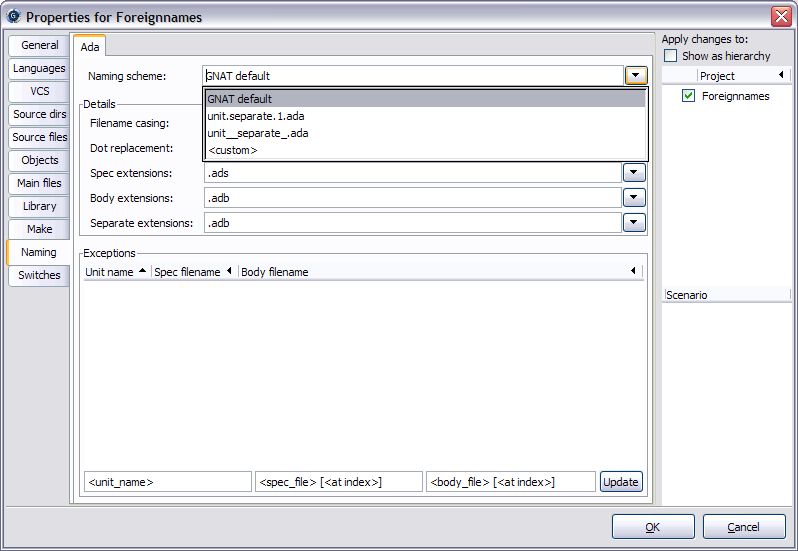
If none of the predefined schemes match your convention you may create a new convention by selecting “custom” in the pull-down list, giving the scheme a new name to replace “custom” and then specifying the details of the convention in the various “Details” entry panes.
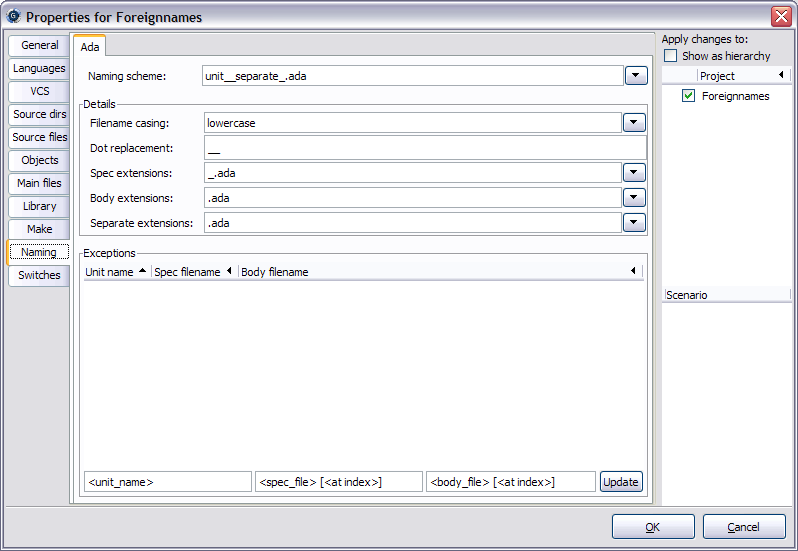
In the following figure we have selected a common scheme in which spec file names end with an underscore, both kinds of file end with “.ada”, and dots in Ada unit names are replaced by a a double underscore.
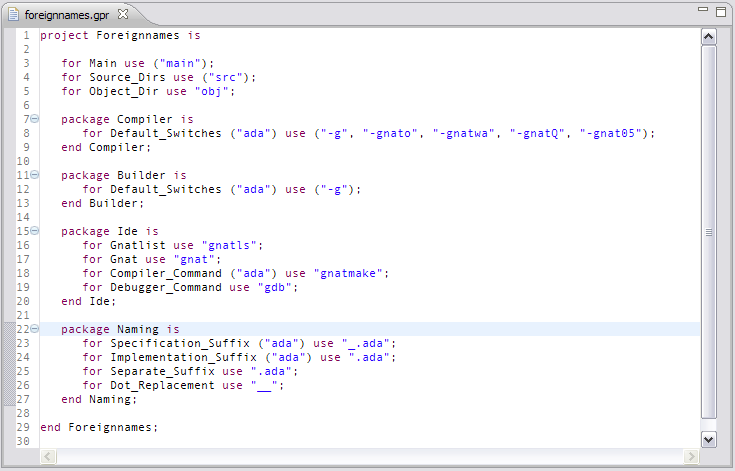
The GUI makes your changes effective by modifying the GNAT project file (the “gpr file”) if you choose to save the changes. In this case, it either adds or changes a package named “Naming” within the file. For the above selections these changes would look like the following:
As an alternative to the GUI, you may also simply edit the gpr file manually and insert the package Naming and its contents.
4.6.2. Associating the File Name Extension with the Ada Editor
For the second step, you set the file associations via Eclipse preferences. Specifically, invoke the Window menu and select Preferences to invoke the dialog. Then expand the General and Editors categories. You should now see a choice “File Associations” underneath the Editors category. Click it to open that page.
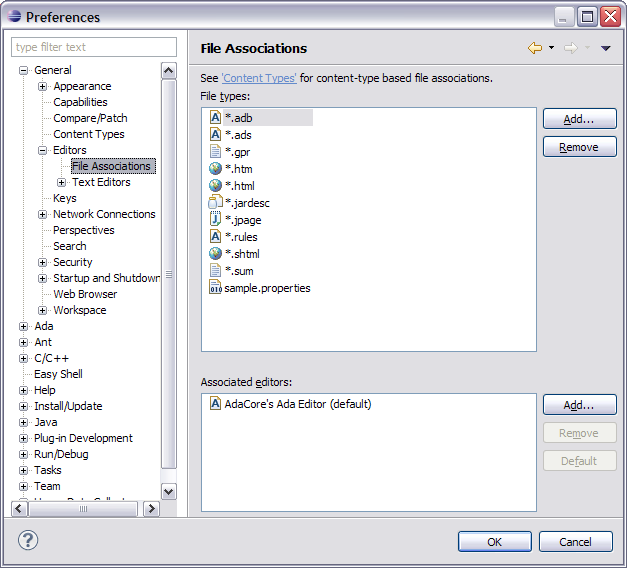
In that page you will see a list of file name extensions on the upper part of the page, and associated editors in the lower part. If your extension is not defined, click the Add button to open a new dialog and specify your extension (e.g., “*.ada”, but without the quotes). For example, the following figure illustrates the Add button dialog with “*.ada” specified:
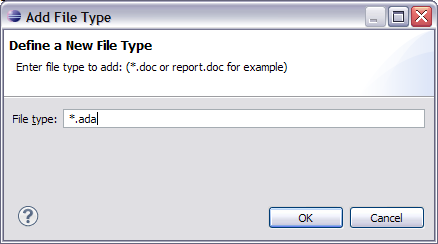
Press OK to close the Add extension dialog.
Then, back in the File Associations page of the original dialog, select your new extension in the upper part of the page and press the other Add button, the one for the editors in the lower part of the page. Another popup will appear, in which you will select “AdaCore’s Ada Editor”:
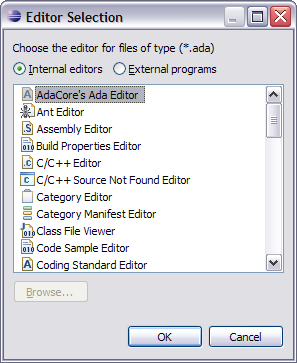
Press OK to close the editor selection dialog. The completed association will appear in the File Associations page:
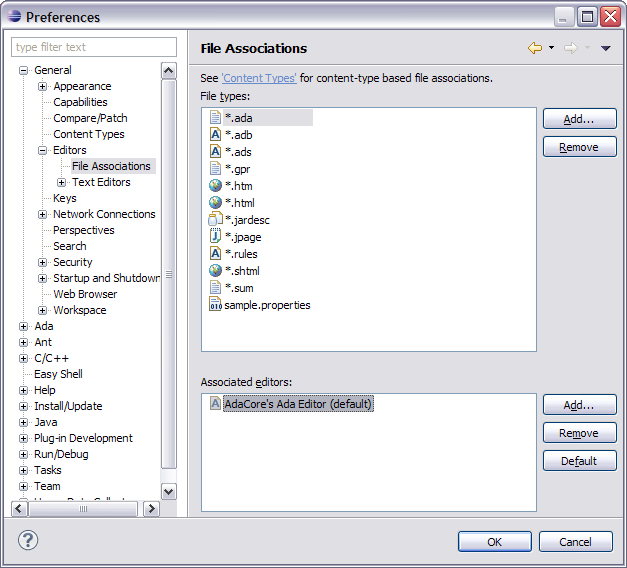
Press OK again to close the Preferences dialog and you’re done.