6. Developing Ada Source Code
6.1. Language-Sensitive Editing
6.1.1. Invoking the Ada Language-Sensitive Editor
Simply double-click on an Ada file in either the GNAT Project Explorer or the Navigator to invoke the GNATbench language-sensitive editor. You can also right-click on the file in the Navigator and select “Open” from the contextual menu.
If opening an Ada source file does not invoke the GNATbench editor by default, there are two options available. The first is to right-click on the file icon in the Project Navigator, select “Open With” in the contextual menu, and then select “AdaCore’s Ada Editor”. This approach, however, must be followed each time a file is to be edited.
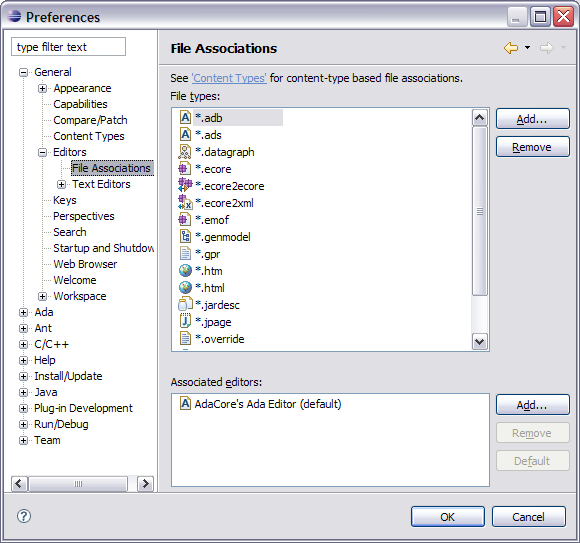
The much more convenient alternative is to associate the GNATbench editor with Ada files by default. This effect is achieved by associating the editor with the appropriate file name extensions, as illustrated below. Note that in the illustration we are associating the editor with the GNAT default Ada file name extensions; other extensions are equally possible.
6.1.2. Syntax Coloring
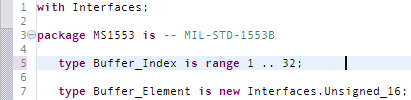
Using the Syntax Coloring, users specify the colors displayed for reserved words, comments, annotation comments, string literals, numeric literals, character literals, and user-defined text. The defaults are as shown below, in which the reserved words are in magenta, string and character literals are in blue, numeric literals are in black, comments are in light green, and user-defined text is in black.
6.1.2.1. Annotation Comments
Annotation comments are Ada comments recognized by the editor as having additional meaning and therefore to be colored distinctly from regular comments. By default, these comments are colored red.
Lexically, annotation comments are those that have a non-whitespace or non-alphanumeric character immediately following the initial “–”, other than another dash. All annotation comments appear in the same color.
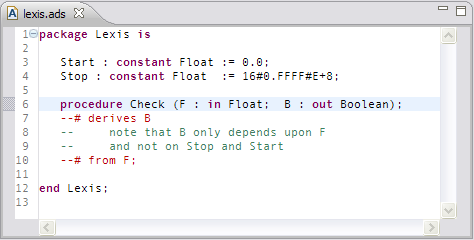
For example, the SPARK language defines annotation comments as starting with the sequence “–#”, as in the following example taken from John Barnes’ High Integrity Software: The SPARK Approach to Safety and Security:
6.1.3. Formatting Source Code
The GNATbench Ada language-sensitive editor provides a large number of built-in formatting controls that can be applied manually or automatically. These formatting controls are described in this chapter.
Note that you can format an entire file using the external pretty printer tool. See Pretty Printer for details.
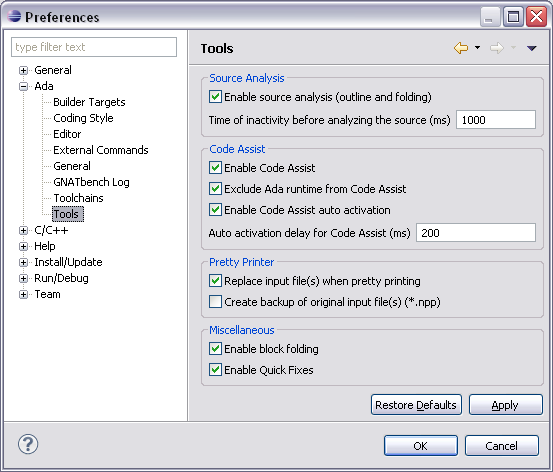
Specific aspects of formatting are controlled by the Coding Style preference page.
Each of these formatting controls is applied when the formatting command is invoked, but in general they can be individually configured to have no effect if that is the desired behavior.
6.1.3.1. Manual Invocation
The formatter is manually invoked by pressing Ctrl+Shift+F, or by selecting “Format” under the Ada menubar entry and the editor’s Ada contextual menu. This command corrects applies the formatting options, including indentation.
Individual lines can also be formatted: if no selection is active when the command is invoked, only the current line is formatted.
In addition, indentation can be manually corrected by pressing Ctrl+I, or by selecting “Indent” under the Ada menubar entry and the editor’s Ada contextual menu. No other formatting options are applied in this case.
6.1.3.2. Automatic Invocation
The editor can format code automatically as you press the Enter key, depending on the value of the “Coding style mode” preference on the “Coding Style” preference page.
Selecting the mode “None” means no formatting will be applied; the cursor will simply go column 1 of the new line.
The “Simple” mode means that the indentation from the previous line will be used for the next line; the beginning of the new line will be indented to the same amount as the line containing the cursor when the Enter key was pressed. No other formatting is applied.
For example, in the following figure the mode is “Simple” and the Enter key is about to be pressed:

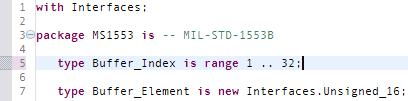
After the Enter key is pressed, a new line is opened and indented to the same amount as the line above:
In the “Extended” mode, the line is automatically formatted. The formatter indents the new line as you would indent it yourself, based on the context. For example, if you start a new sequence of statements with the reserved word “begin” and press the Enter key, the new line after the “begin” will be indented to the next level. All other formatting options are also applied.
See Smart Enter Key for an example.
6.1.3.3. Formatting Selected Lines
When a number of lines of source are selected, the selected code will be formatted based on an analysis of the selection as well as the surrounding code. In particular, the selection will be indented relative to that of the surrounding code.
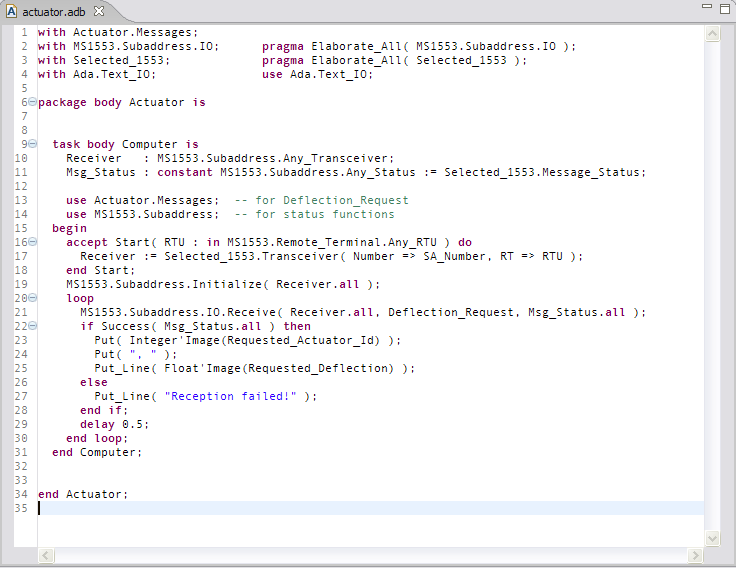
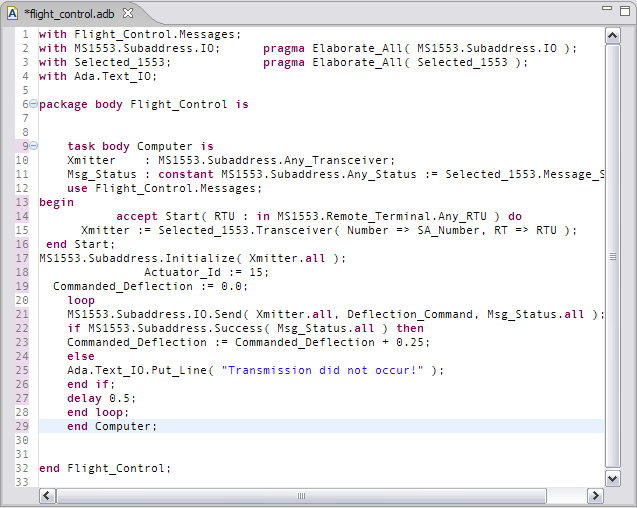
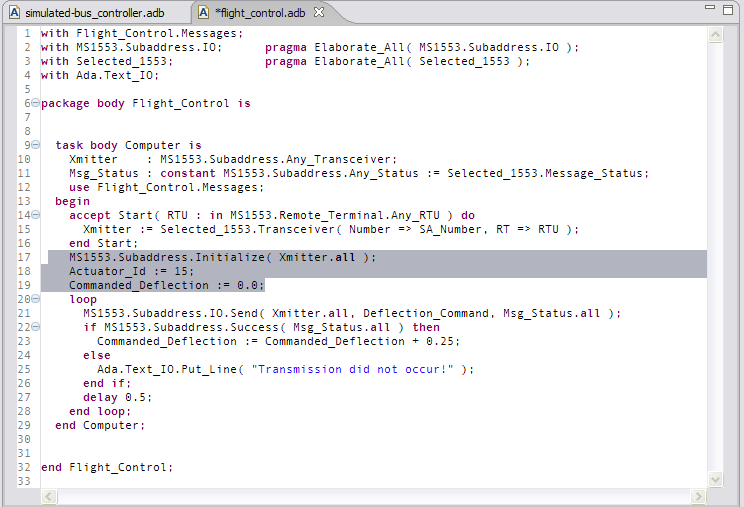
In this initial figure, the lines for the task body are incorrectly indented (in an admittedly unlikely extreme).
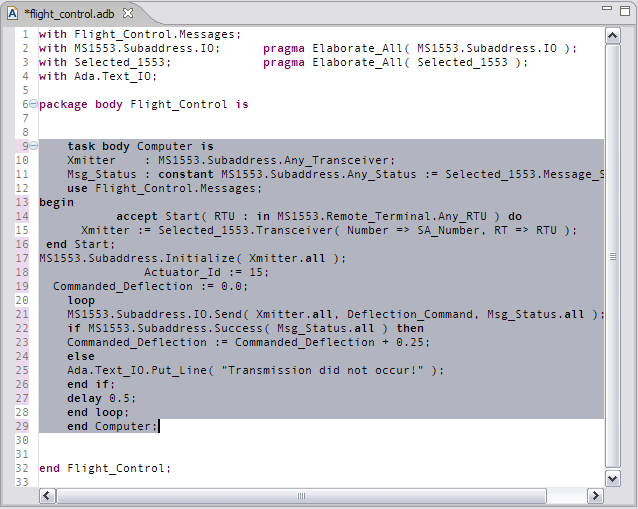
We select those lines that require reformatting in the next figure. In this case all of the task body is selected:
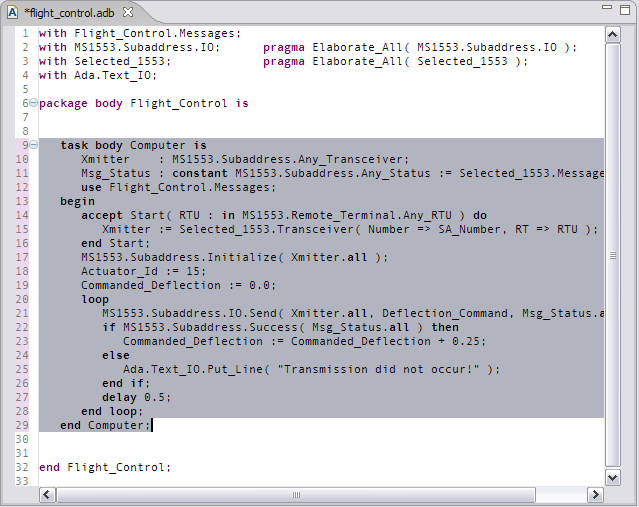
The following figure shows the result after formatting. The selection itself is now properly indented but, in addition, its indentation is consistent with the surrounding code.
6.1.3.4. Indenting Continuation Lines
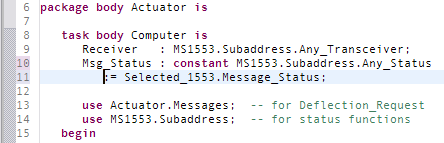
The numeric preference value “Continuation lines” specifies the amount to indent when the Enter key is pressed before the end of a line, thereby continuing that line on a new line below. This new line is indented by the value of the preference. In the following example, the Enter key was pressed on line 10, just before the semicolon of the assignment operation. All text to the right of the cursor was then moved down to a new line, now line 11, with the indentation preference value applied.
6.1.3.5. Indenting Declaration Lines
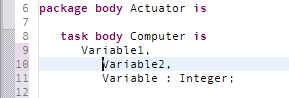
The numeric preference value “Declaration lines” specifies the amount to indent multiple-line declarations. For example, using a value of 3, the following figure illustrates how three variables declared with one declaration would be indented:
6.1.3.6. Indenting Conditional Continuation Lines
The numeric preference value “Conditional continuation lines” specifies the amount to indent multiple-line conditional expressions within parentheses.
For example, when this preference is set to 1, continuation lines are indented based on the previous parenthesis plus one space:

When this preference is set to 3, this gives:

6.1.3.7. Indenting Record Definitions
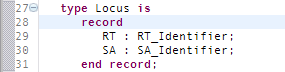
The numeric preference value “Record indentation” specifies the amount to indent record definitions when the reserved word “record” appears on its own line.
For example, when this preference is set to 3, the following sample will be indented as shown:
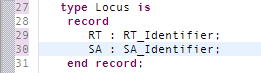
If this preference were to be set to 1, the formatting would be as follows:
6.1.3.8. Indenting Case Statement Alternatives
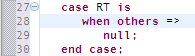
The radio button preference “Case indentation” specifies whether GNATbench should indent case statement alternatives with an extra level, as is done in the Ada Reference Manual, e.g:
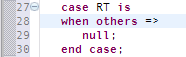
If this preference is set to Non_Rm_Style, this code would be indented as:
By default (Automatic), GNATbench will choose whether to indent based on the first “case alternative” construct: if the first “when” is indented by an extra level, the whole case statement will be indented following the RM style.
6.1.3.9. Correcting Letter Casing
Reserved words and identifiers can be formatted per the letter casing specified by the user. Reserved words and identifiers are configured individually in the Coding Style preferences via the “Reserved words casing” and “Identifier casing” preferences.
There are five letter casing modes supported. These modes are described in the following paragraphs and are cased in a manner indicating their effect.
With the first mode, “none”, no formatting changes occur.
Using the second mode, “lower_case”, reserved words and/or identifiers are changed to all lower-case.
Using the third mode, “UPPER_CASE”, reserved words and/or identifiers are changed to all upper-case.
Using the fourth mode, “Mixed_Case”, reserved words and/or identifiers are changed such that the first letter of the word and any letter immediately following an underscore are in upper-case, with all other letters in lower-case.
The fifth mode, “Smart_CASE”, is similar to Mixed_Case except that upper-case letters remain in upper-case. For example, “text_IO” becomes “Text_IO” in this mode. The benefit of this mode is that upper-case acronyms in the identifier are retained.
6.1.3.10. Formatting Operators and Delimiters
The checkbox preference “Format operators / delimiters” specifies whether the editor should add extra spaces around operators and delimiters, if needed. If enabled, an extra space will be added when needed in the following cases: before an opening parenthesis; after a closing parenthesis, comma, semicolon; around all Ada operators.
6.1.3.11. Indenting with Tab Characters
The checkbox preference “Use tabulations” specifies whether the editor should use tab characters when indenting. Space characters are used unless this preference is enabled.
6.1.3.12. Aligning Colons in Declarations
The checkbox preference “Align colons in declarations” specifies whether the editor should automatically align colons in declarations and parameter lists.
Consider the following code, in which the colons are not aligned:

After formatting, the colons would be aligned as follows:

Note that the colons in the declarations within the selection were aligned with those of another declaration, that of line 89, even though the other declaration was not in the selection. The other declaration was considered in the same “block” of declarations because there was nothing separating them, such as a blank line. Hence, the general rule is that the colons of declarations in the same block are aligned, even if not in the selection when formatting was applied. The colons of separate declaration blocks are not aligned, even if selected together, unless by coincidence.
In the following example, two separate blocks of declarations are selected:

After formatting, the colons would be aligned as follows:

6.1.3.13. Aligning Associations on Arrow Symbols
The checkbox preference “Align associations on arrows” specifies whether the editor should automatically align arrows in associations (e.g., aggregates or function calls).
Consider the following code, in which the arrow symbols are not aligned on lines 10 through 13:
With this preference enabled, this code would be indented as:
6.1.3.14. Aligning Declarations After the Colon
The checkbox preference “Align declarations after colon” specifies whether the editor should align continuation lines in variable declarations based on the colon character.
Consider the following declaration, in which the initial (only) value in the continuation line is in the column before that of the colon:

With this preference enabled, it will be indented as follows:

6.1.3.15. Indenting Comments
The checkbox preference “Indent comments” specifies whether to indent lines containing only comments and blanks, or to keep the indentation of these lines unchanged.
6.1.3.16. Aligning Comments on Keywords
The checkbox preference “Align comments on keywords” specifies whether to align comment lines following the reserved words “record” and “is” immediately, with no extra space.
Note that the “Indent comment” preference must be enabled before comments are formatted.
Consider the following source code, in which the comment is indented relative to the line above. This would be the effect of formatting the code with the preference disabled:

With this preference enabled (and with the “Indent comment” preference enabled), formatting the code would result in the following:

6.1.4. Block Folding
To facilitate comprehension of the program, blocks of text can be elided so that they do not appear. Each construct that spans more than one line has a control on the left of the screen that allows the user to expand or collapse the corresponding text.
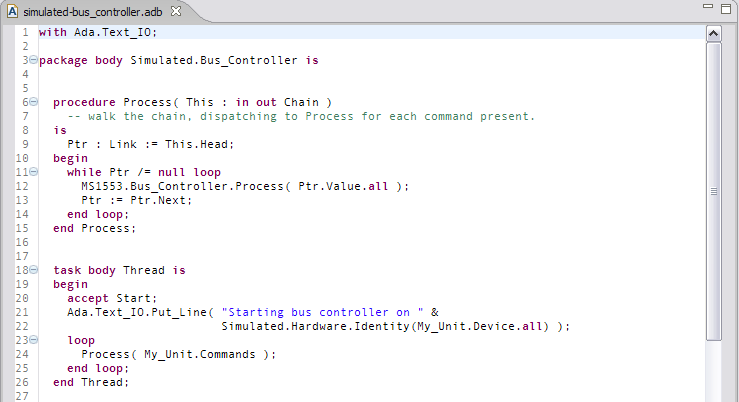
The following illustration shows the folding control (the blue “lozenge” with a dash inside) to the left of procedure Process, prior to the user invoking the elision.
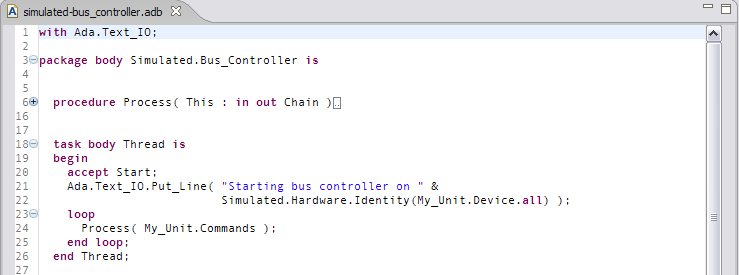
By clicking on the dash, the user elides the procedure Process, as the following illustration shows. Note the dash becomes a plus sign, indicating that the control will now expand the unit if invoked. Note also the elision marker at the end of the elided declaration of Process.
6.1.5. Managing Comments
The Ada language-sensitive editor makes it easy to convert existing text to comments, to convert comments back to non-comment text, and to format comments so that they adhere to margin constraints.
6.1.5.1. Toggling Comments
The current non-comment source code selection will be converted to comments by pressing control+- (control dash). Similarly, comment lines are converted back to regular code by the same key sequence. Alternatively, the transformation can be achieved by invoking the “Toggle Comment” command available under the Ada menubar entry and the editor’s Ada contextual menu. using the contextual menu invoked by right-clicking in the source file and selecting Toggle Comment.
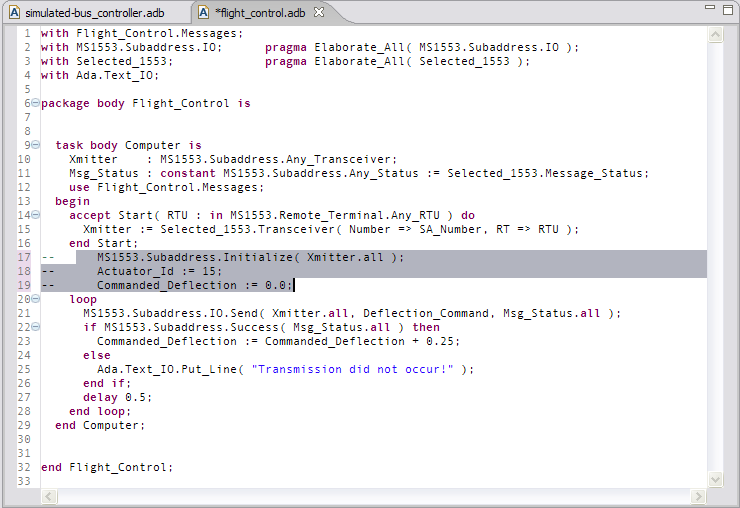
The following figure illustrates a selection of non-comment code about to be converted into comments:
After invoking the command the selected lines are commented, as the following figure shows.
6.1.5.2. Reformatting Comments
Comment lines as well as lines of arbitrary text within an Ada source file can be adjusted so that none of the text flows past the Eclipse “print margin” boundary. Comment lines remain as comments after this reformatting; non-comment lines remain non-comments.
The action can be applied to individual lines or to a selection of lines within an Ada source file. If no selection is active when the command is invoked, only the line containing the cursor will be reformatted.
The command is invoked by simultaneously pressing the Alt+Shift+| keys, or by invoking the “Refill Selection to Margin” command available under the Ada menubar entry and the editor’s Ada contextual menu.
If the Eclipse print margin margin is not enabled no reformatting will occur. You can tell if the margin is set by the appearance of a colored vertical line in the editor immediately after the column corresponding to the margin. Use the General/Editors/Text Editors preference page and look for the “Show print margin” check-box. On that page you also specify the column for the margin and can control the color of the resulting line.
The figures below illustrate the application of the editor action. In the first figure, a block of comments that goes past the print margin is selected. The margin is indicated by the vertical gray line to the right inside the editor box.
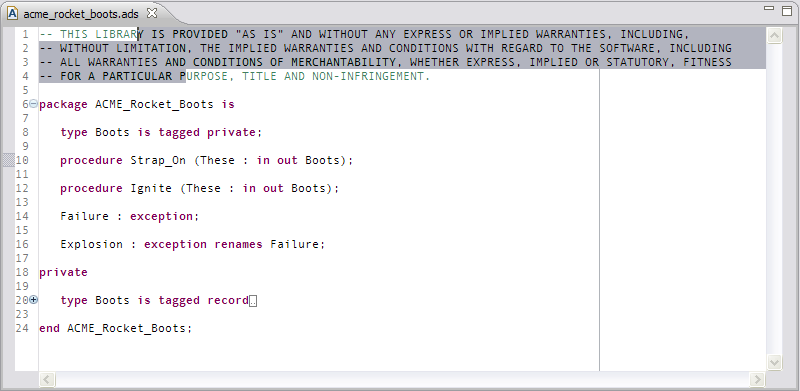
The command is then invoked and the text is refilled so that none of the text goes past the print margin:

6.1.6. Parentheses Highlighting
Moving the cursor after a parenthesis highlights the corresponding parenthesis.
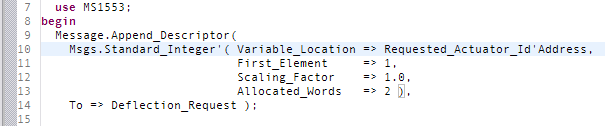
In the following figure, the cursor is immediately after the inner parenthesis on line 10. Note the box highlighting the matching parenthesis on line 13.
You may enable or disable this action as well as control the color of the highlighting box using the “Highlight matching brackets” preference on the Editor page.
6.1.7. Automatic Construct Closing
While editing Ada source files, you can invoke the “Insert End” command to insert the required text to close a construct.
The editor command is bound to the Alt+End key sequence and is also available via the Ada menu on the menubar and the editor’s contextual menu.
For constructs without an associated name, such as record type definitions and if-statements, the Insert End command will insert the corresponding simple completion.
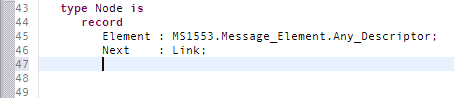
For example, the following figure shows an incomplete record type definition with the Insert End command about to be invoked:
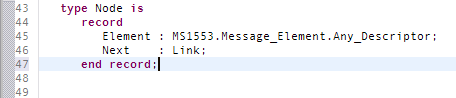
After invocation, the closing “end record;” sequence has been inserted and properly indented relative to the word “record”:
For the end of a program unit’s sequence of statements, the action will insert the “end” followed by the name of the unit.
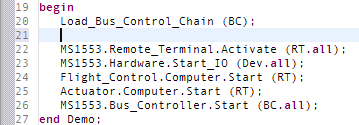
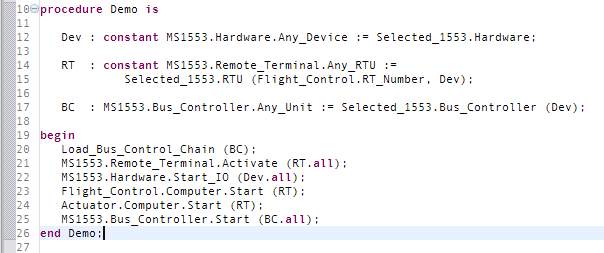
For example, the next figure shows a procedure Demo without the closing “end”. Note that the cursor is indented as if another statement is about to be entered:

After invocation, the closing “end Demo;” sequence has been inserted and properly indented:
Constructs with labels are completed in a similar manner.
6.1.8. Smart Enter Key
The Smart Enter key will automatically format the code of the current line if the “Coding style mode” preference is set to “extended” in the Coding Style preferences page. The effect is as if manually applying the Format command to the line.
See Formatting Source Code for the details of the formatting applied.
In this initial figure, assume the “Coding style mode” is set to “extended”. Also assume that reserved words are to be in lower-case, identifiers are to be Smart_CASED, and that the default indentation is 3. The cursor is at the end of the line:
When we press the Enter key, the line is automatically formatted and the cursor is automatically indented to the appropriate location for the sequence of statements within the if-statement:
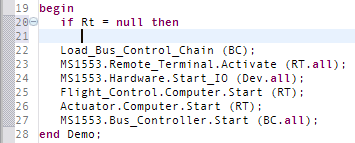
Note that, after the line is formatted, the identifier appears as “Rt” even though it appears as “RT” elsewhere. Since the identifier was “rt” before formatting and the casing policy was “Smart_CASED”, it becomes “Rt” after formatting.
6.1.9. Smart Space Key
The Smart Space Key will expand abbreviations for Ada reserved words and will, for those constructs that take a name or a label on the “end”, also expand those abbreviations into partially-complete constructs with the corresponding name or label included.
Expansions follow the user’s letter casing preferences for reserved words and identifiers.
The Smart Space Key is disabled by default and is controlled by preferences on the Editor preference page.
If the action is enabled, the additional relevant preference is the length of words considered as candidate abbreviations to be expanded. The default length is three characters, meaning that only words three characters or longer will be considered. Thus the facility is minimally intrusive and, moreover, the degree of intrusion is under your control.
If the preference is disabled, pressing the space key will insert one space, as usual.
6.1.9.1. Reserved Word Expansion
If an abbreviation of a reserved word is either on a line by itself or follows only a label, that abbreviation is expanded into the full spelling. Note that not all reserved words are candidates for expansion: they must be long enough for expansion to be of use in the first place.
For example, in the following figure the word “proc” has been entered and the space key is about to be pressed:
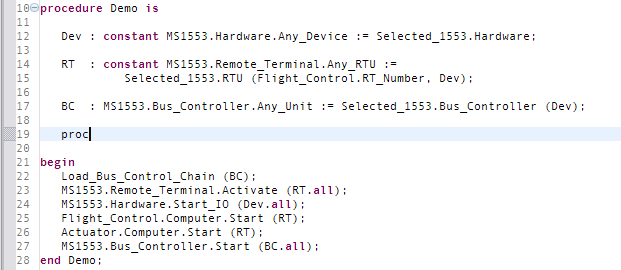
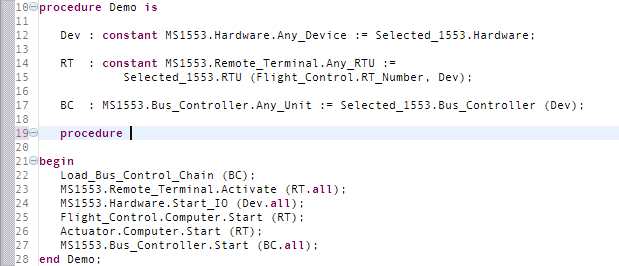
After the space key is pressed the abbreviation has been expanded to the full reserved word (and a trailing space has been inserted):
A reserved word that is fully spelled does not require expansion itself, but, for the sake of minimal intrusion, also does not invoke the construct expansion described below. Thus a user who types everything will not be intruded upon except for the case in which a user-defined identifier matches an abbreviation for a reserved word. To mitigate this effect the minimum abbreviation length may be set to a larger value by altering the preference.
Note that “for” is treated specially. It is a complete reserved word but is nonetheless expanded. Also, “for” is the start of an attribute definition clause so it will not expand unless it appears in a sequence of statements.
6.1.9.2. Begin-End Pair Expansion
Begin-end pairs for program units are expanded to include the corresponding unit name. Nested declarations are ignored such that the correct name is used in the expansion.
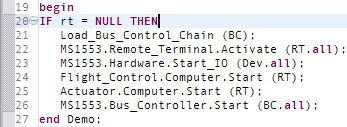
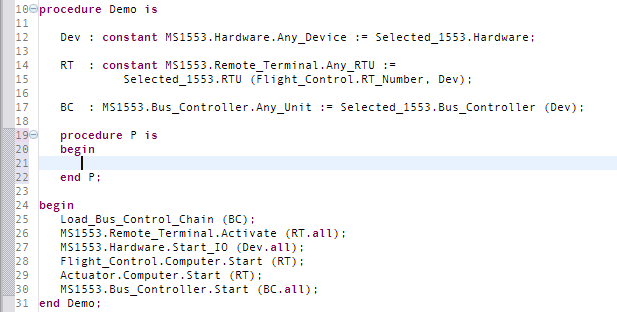
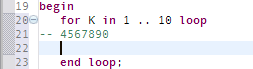
For example, in the following figure the abbreviation “beg” has been entered on line 20 and the space key is about to be pressed:
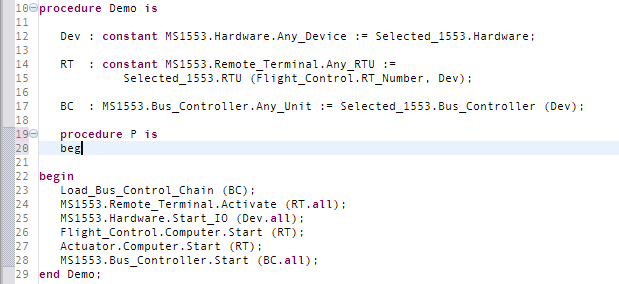
After the space key is pressed the abbreviation for “begin” has been expanded to the full begin-end par with the name of the procedure included. The cursor is placed inside the sequence of statements at the initial indentation level, to a depth specified by the indentation preference:
6.1.9.3. Named Statement Expansion
Constructs that require a trailing name are expanded to include that name. These include named block statements, named basic loops, named while-loops, and named for-loops.
For example, a named loop is required to have the loop name follow the “end loop”. In the following figure the name and loop abbreviation have been entered and the space key is about to be pressed:
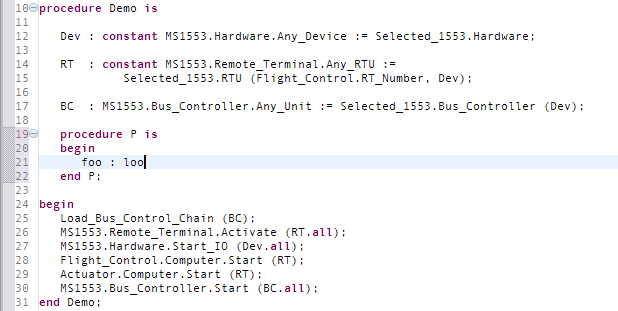
After the space key is pressed the loop has been expanded with the name of the loop included. The cursor is placed inside the sequence of statements at the initial indentation level, to a depth specified by the indentation preference:

Note also that the user-specified letter casing has been applied to the name (in this example the “Smart_CASED” policy was in force) and the reserved words are similarly formatted (with the “lowercase” policy in this instance).
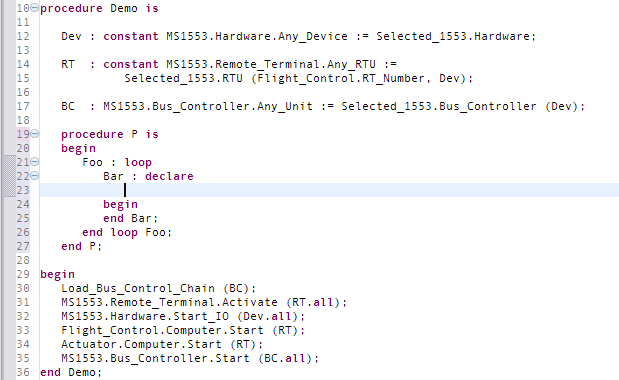
Continuing the example, we can now insert a named declare block. In the following figure the name and abbreviation have been entered and the space key is about to be pressed:
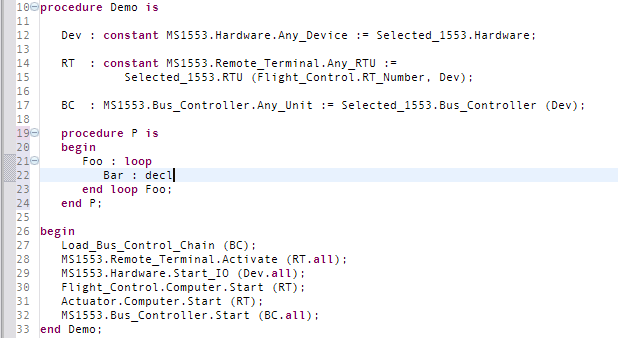
After the space key is pressed the declare block has been expanded with the name of the block included. Since this is a block statement with a declarative part, the editor expects that declarations are intended and places the cursor in the declarative region:
6.1.9.4. Unnamed Statement Expansion
The named constructs above do not require names, they just require the name to be repeated if a name is given in the first place. For completeness these constructs will also expand when no name is applied.
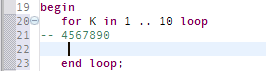
For example, in the following figure the word “for” has been entered on line 21 and the space key is about to be pressed:
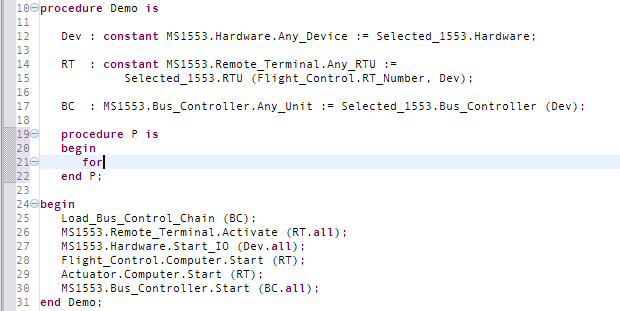
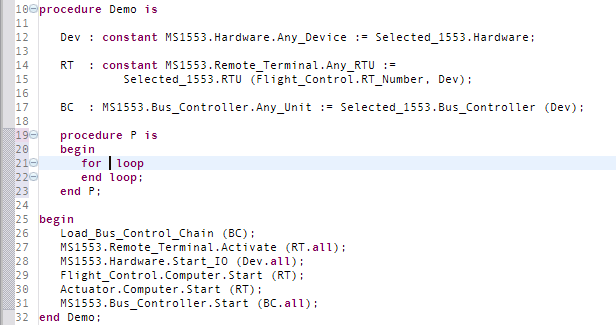
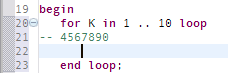
After the space key is pressed the loop has been expanded and the cursor is placed so that the loop parameter specification can be entered:
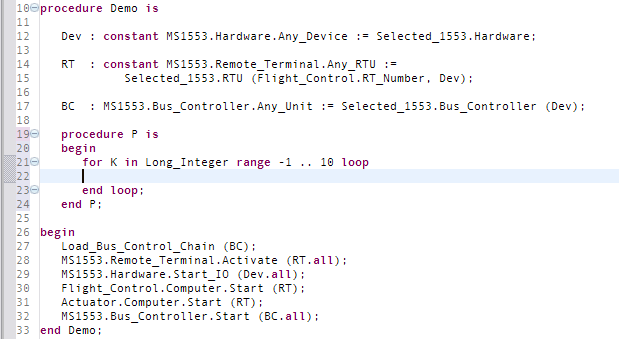
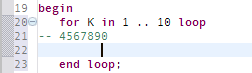
After entering the loop parameter specification you press the End key to go to the end of the line and then press the Enter key to open a new line within the loop:
6.1.10. Smart Tab Key
Pressing the Smart Tab key will indent to the next “logical indentation” column on the line. It does so by inserting spaces, but only the required number of spaces are inserted so that this next position is reached, rather than always inserting a fixed number of spaces.
The “logical indentation” columns are determined by the numeric “Default indentation” preference on the Coding Style preference page. The first “logical indentation” position is at column 1. Each subsequent position is calculated by adding the value of the “Default indentation” preference to the previous position.
The Smart Tab Key is enabled by default and is controlled by the “Use smart tab key” preference on the Editor preference page.
If the preference is disabled, pressing the tab key will insert the number of spaces specified by the “Default indentation” preference.
For the following example, assume the “Default indentation” value is 3. As a result, the logical indentation positions are 1, 4, 7, 10, and so on.
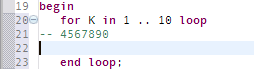
In this first figure the cursor is on column 1. We have included a comment indicating the column numbers for the sake of illustration:
Pressing the Smart Tab key indents to column 4:
If we enter a space character, the cursor will then be on column 5.
Pressing the Smart Tab key again now inserts only two spaces to get to the next “logical indentation” column, i.e., column 7:
Pressing the Smart Tab key again inserts three spaces to get to column 10:
6.1.11. Smart Home Key
When first pressed on a given line, the Smart Home key will place the cursor on the column containing the first non-blank character of that line. Subsequent presses will cause the cursor to toggle back and forth between column 1 and the column of the first non-blank character.
In the following figure, the cursor is in the middle of a line of Ada source code:
If you press the Smart Home key, the cursor moves to the column of the first non-blank character on that line:
If you press the Smart Home key again, the cursor moves to column 1 of that line:
If you press the Smart Home key yet again, the cursor moves back to the column of the first non-blank column:
All subsequent presses on the same line will continue to toggle back and forth.
6.1.12. Smart End Key
The Smart End key works in a manner analogous to the Smart Home key, with the obvious difference that it works with the end of the line instead of the beginning. Another difference is that there may not be any characters after the last non-blank character, in which case the cursor will remain on the column of the last non-blank for subsequent presses of the key on that line.
Note that the “Remove trailing spaces when saving” preference on the Editor preference page will remove trailing spaces when an Ada source file is saved.
If there are whitespace characters after the last non-blank character on the line, the Smart Home key will toggle back and forth between the last of them and the last non-blank, as illustrated in the figures below.
In this first figure, the Smart End key has been pressed and therefore the cursor is on the last non-blank character:
There is whitespace after that column in this example, so pressing the Smart End key again moves the cursor to the last of them:
Pressing the Smart Home key again moves the cursor back to the last non-blank character:
All subsequent presses on the same line will continue to toggle back and forth in that manner.
6.2. Code Assist
6.2.1. Code Assist
Code Assist is an editing capability provided by programming-language-oriented editors in Eclipse that completes identifiers based on semantic analysis and context. Simple identifiers, subprogram formal parameters, and entities named using the “dot notation” are candidates for completion. GNATbench implements Code Assist for Ada 83, Ada 95, and Ada 2005.
When invoked, Code Assist displays the candidate completions in a pop-up window (the “smart completion window”), including information about each candidate to facilitate selection. The specific information displayed depends on the candidate. For example, the type of a candidate variable will be displayed, as well as documentation extracted from comments surrounding the declaration of the candidate. Similarly, if the completion candidate is a subprogram invocation, the formal parameters will also be displayed so that you can choose among possibly overloaded subprogram choices.
GNATbench keeps track of your previous selections and will put them at the top of the list of proposals when they are accurate.
No pop-up window is displayed when, based on the current partial entry, no candidates are available.
6.2.2. Enabling Code Assist
Code Assist for Ada can offer completion candidates from the entire project. To do so, an entity database must be loaded. This loading occurs in the background, asynchronously, and does not force you to wait. However, if you want to disable this loading, simply disable the Code Assist preference. The preference is enabled initially, and, as a result, by default the entity database is loaded when GNATbench starts.
6.2.3. Invoking Code Assist
Code Assist for identifiers is invoked by pressing the control+space key combination inside any Ada source file. This is the default key binding for all Eclipse editors that support the feature but users can change the key binding, as always.
To use this feature for simple identifiers, begin to type a name inside an Ada source file. This identifier must be declared either in the current file (and prior to the cursor location) or in one of the packages of the project loaded. With the cursor right after the last character of the incomplete identifier, press the Code Assist key sequence. Eclipse will open the Smart Completion window displaying all the known identifiers beginning with the prefix you typed. You can then browse among the various proposals using the Up and Down keys or using the scrollbar. Typing additional letters of the identifier will reduce the range of proposals as long as possible candidates remain.
Once you’ve selected the intended completion you can apply it by pressing Enter. The identifier will be completed with that selection and you can continue to enter further text.
You may reject the list of candidates and terminate Code Assist by pressing the Escape key.
Code Assist is automatically invoked when entering dotted names and when entering parameters for a subprogram call. The Smart Completion window will open when the dot or the open (i.e., left) parenthesis is entered. Code Assist is not invoked if another character is entered in a short amount of time, so that touch typists are not inconvenienced.
When entering parameters for a subprogram call, you can manually invoke Code Assist after entering some of the parameters to see proposals for the remaining parameters, if any.
6.2.4. Simple Name Completion
Much like the name completion provided by the alt+/ key binding, Code Assist will complete the name of an identifier by itself. It need not be a part of some other name or a formal parameter. Just press the Code Assist key sequence and any candidates will be presented.
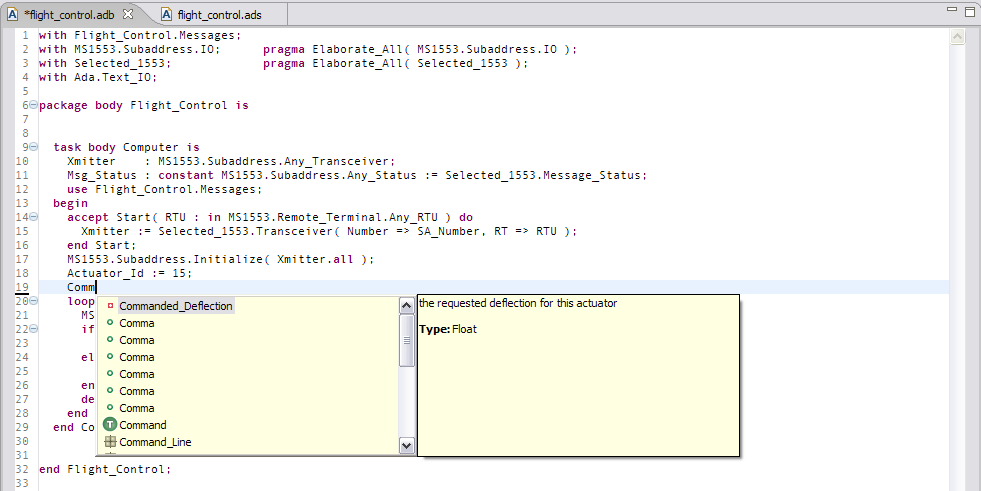
In the following figure we invoke Code Assist in the middle of entering the text “Comm” so we get all possible completions starting with that character sequence. Note the descriptive text in the window for Commanded_Deflection. This description comes from the comment(s) following the declaration of the object.
6.2.5. Dotted Name Completion
Any identifier that immediately follows a dot can be completed by Code Assist, particularly entities declared within packages and within record objects. For example, if you type “with Ada.” the smart completion window will appear automatically, listing all the child and nested packages of Ada. You can also write the beginning of the package, e.g.: entering “with Ada.Text” and pressing the Code Assist key will offer you “Text_IO”.
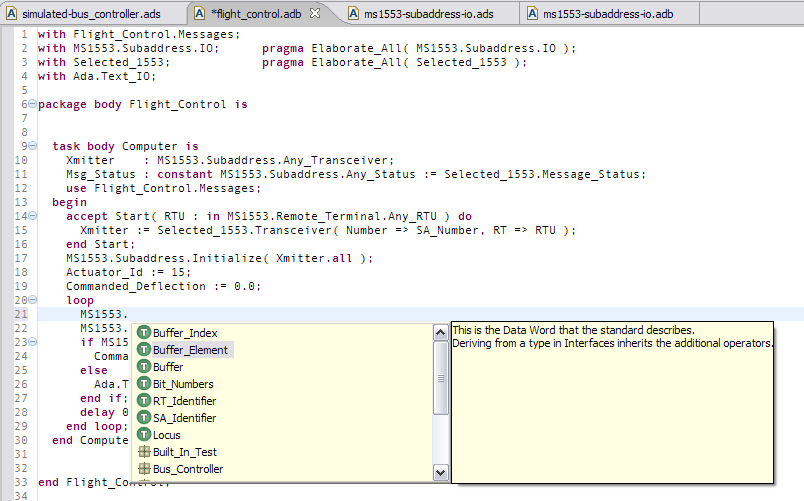
In the following figure, we invoke Code Assist after entering the name of the package MS1553. The completion window then proposes candidates consisting of the entities declared within the package as well as child packages rooted at MS1553. Note the icons indicating the kinds of entity proposed. In this case types and child packages are depicted:
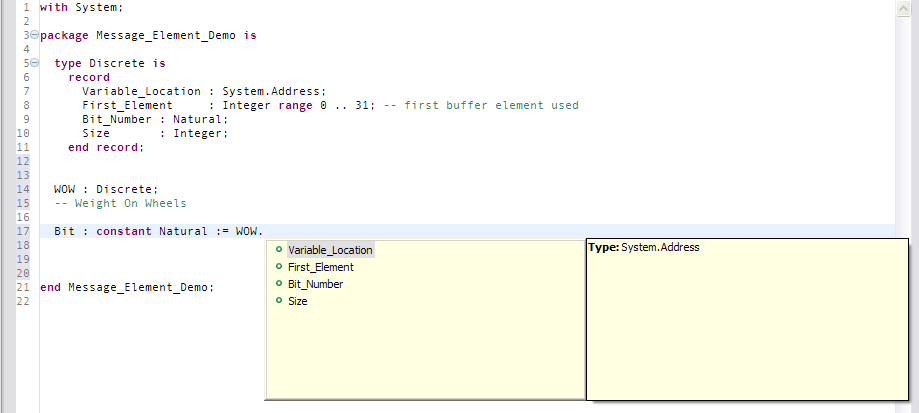
Code Assist is proposing the components of a record object in the following figure. Here, the object WOW is of type type Discrete, a record type containing the four components indicated in the smart completion window:
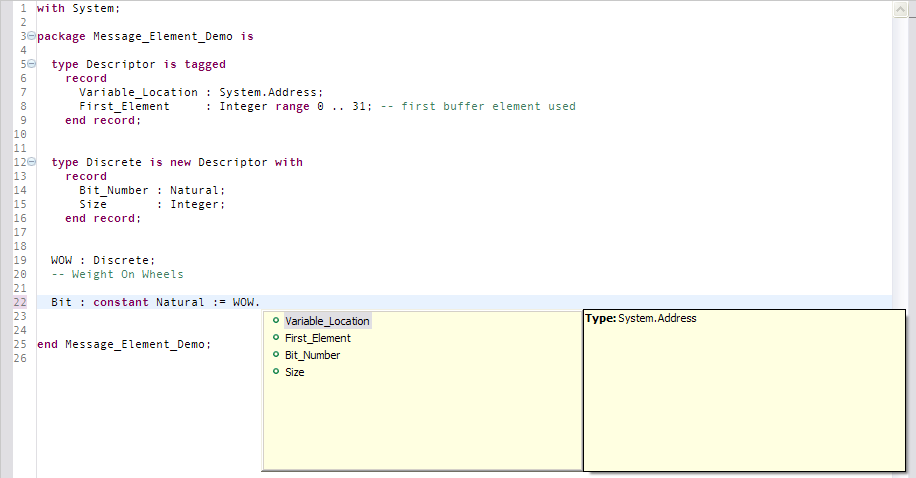
Code Assist can handle derived record types too, and will include in the smart completion window all inherited record components that are visible at the point of the invocation.
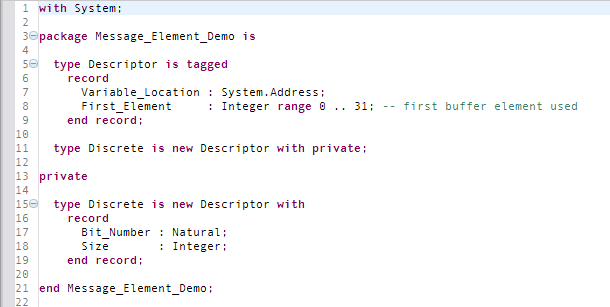
In keeping with the Ada visibility rules, components of private types are not proposed if they are not visible. In this next figure we declare type Discrete as a private extension so outside the package the components are not visible (except to child units):
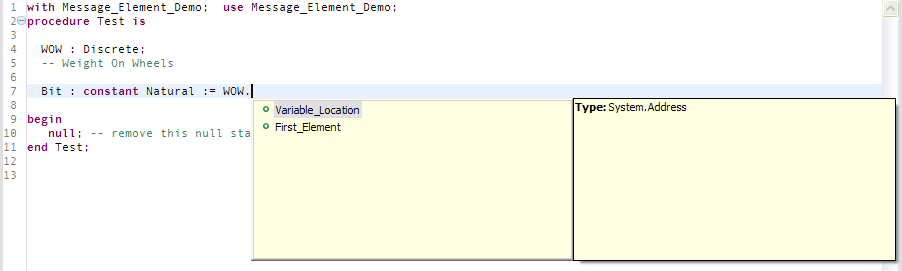
Then, when we invoke Code Assist outside the package, only the visible components are proposed:
6.2.6. Formal Parameter Completion
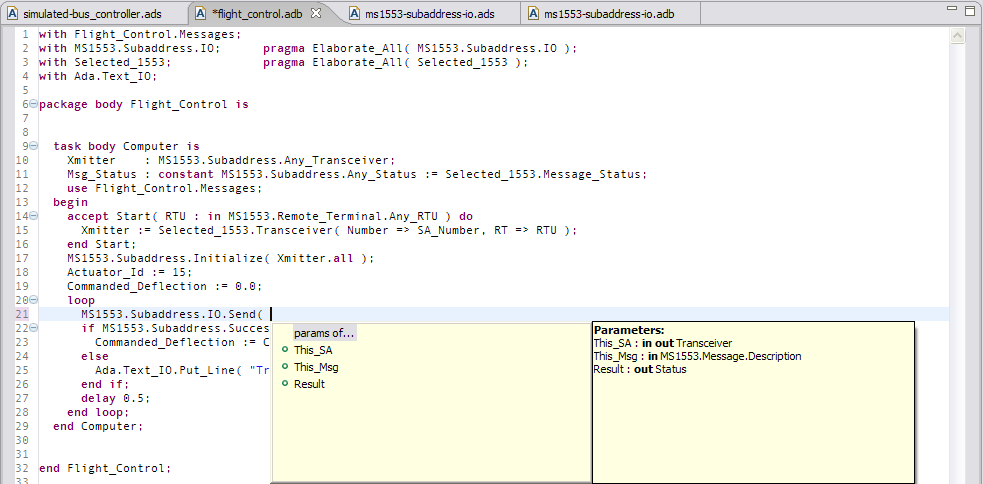
Code Assist can suggest the possible formal parameters of a subprogram call you’re currently writing. For example, the figure below shows a call to a procedure declared as folows:
procedure Send( This_SA : in out Transceiver'Class; This_Msg : in MS1553.Message.Description; Result : out Status'Class );
After you type the opening parenthesis, Code Assist will automatically propose a completion consisting of all the formal parameters, as well as proposing each formal as an individual completion. That is the case in the following example:
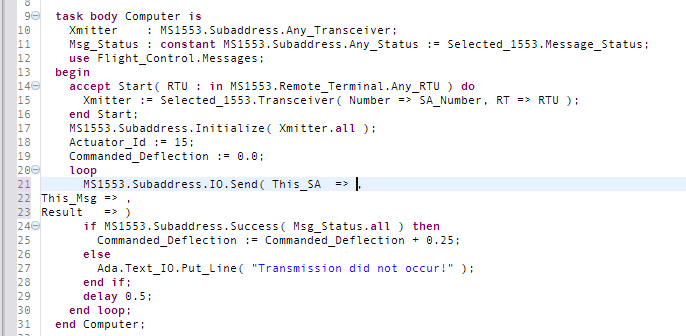
Selecting “params of…” inserts all the (remaining) formal parameters using the named parameter association format, and places the cursor where the first actual parameter will go:
You can, of course, also select an individual formal parameter candidate and it will be inserted next, again using the named association format.
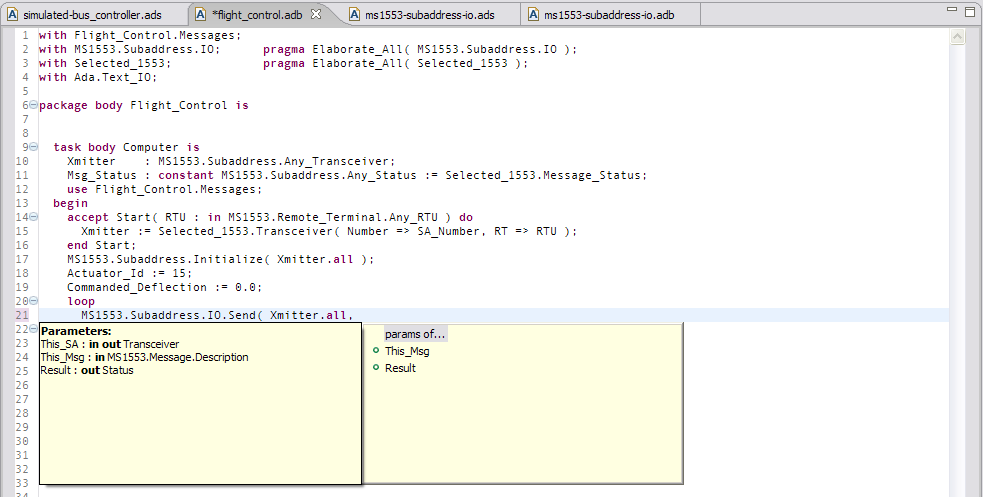
Alternatively, only the remaining formals are proposed if you manually invoke Code Assist in the middle of entering the actual parameters. Thus you can either choose a completion containing all the remaining formal parameters, or individual completions from the remaining formals. Continuing the example, invoking Code Assist after the comma in the following situation:
Send( Xmitter.all,
would cause the completion engine to propose parameters This_Msg and Result but not This_SA, as well as all those remaining:
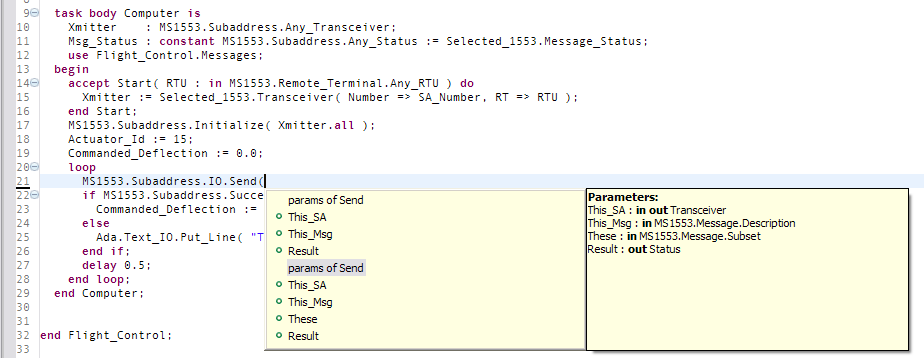
When multiple subprograms are overloaded the parameters for each subprogram are indicated, separated into their corresponding groups. In the following figure there are two procedures named Send. We have selected the formal parameters of the procedure with four formals instead of three:
6.2.7. Limitations
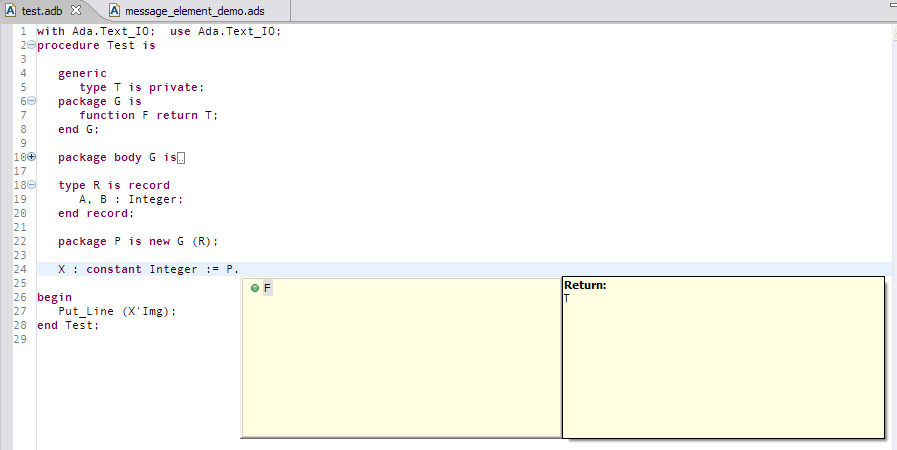
Code Assist does not take into account the association between generic formal parameter types and generic actual parameter types when attempting to complete a reference via the formal.
For example, in the following figure, the generic formal type T is matched during the instantiation with generic actual type R. Type R has record components, but these components are not available as candidates via objects viewed as of type T. Therefore, in the figure we can request a completion of P. and the engine will propose the function name F, but there is no further completion proposed for P.F. because P.F returns a value of type T and the components are not known to the engine via that type name.